
Traxxas Steering Upgrade
Introduction
I was driving my Traxxas the other day, and the steering broke. I did not do anything really that extreme, and it just broke. I think this is something that happens over time. At least that is what I tell myself. I mean, I was just riding on the truck to go to the store…. just kidding. Seriously, I jumped a curb, and the steering broke. I am not sure if the new tires put more stress on the steering or not. So, I could be upset or I could see this as a chance for another upgrade. I decided to get upset, and then do the upgrade. I call it killing two birds with one stone. I went with something a little more robust.... like Aluminum and not Al-u-min-ium. Our friends over the pond try to minimize the metal or something. Are they saying the metal as a luau minimum? I don’t know, but I just call it aluminum… like it is spelled. I guess I still have some pent-up rage from watching Top Gear when Jeremy Clarkson mocked Americans for our proper pronunciation of their language. I kid…. I kid…. maybe not about the pent-up rage…. I might want to look into that.
The Install
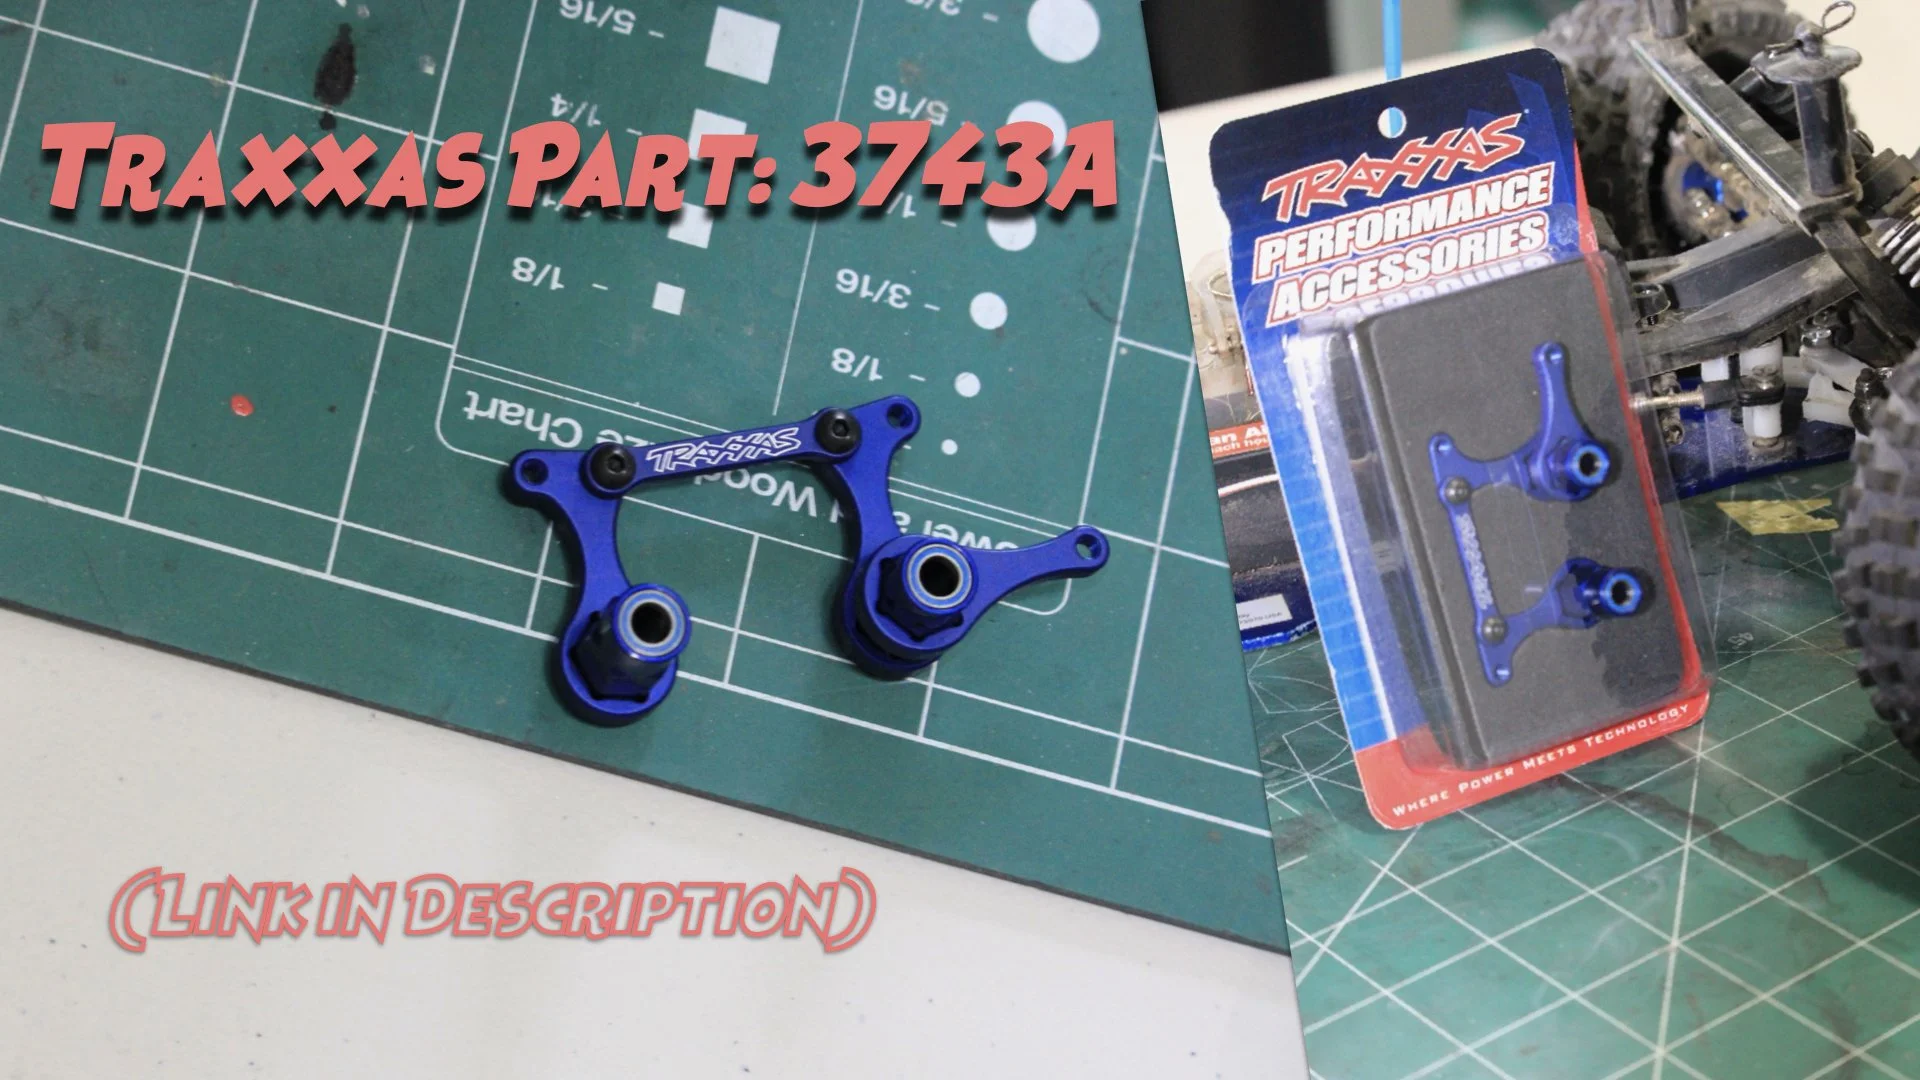
I ordered the Traxxas Part: Traxxas 3743A (If you buy it through Amazon I get some clams.) The total cost is just shy of 30 bucks. It is a reasonable price for what you get. Replacing the steering is not so easy, but it is certainly a serviceable item. I also uploaded the Traxxas instructions here.
Anyhoo, this is how you install it. It took me about an hour to do while shooting video and pics. I think it could be done in probably 20-30 minutes if someone does not have the squirrel distraction propensity. The amount of time to upgrade is not bad, but at the same time, not something you want to do in the midst of a bash. This upgrade makes the steering way more robust and so I would highly recommend it. I would recommend it for the nitro version of this truck.
Here is a screenshot of the directions below. If you click on the image, you will be able to download a PDF copy.

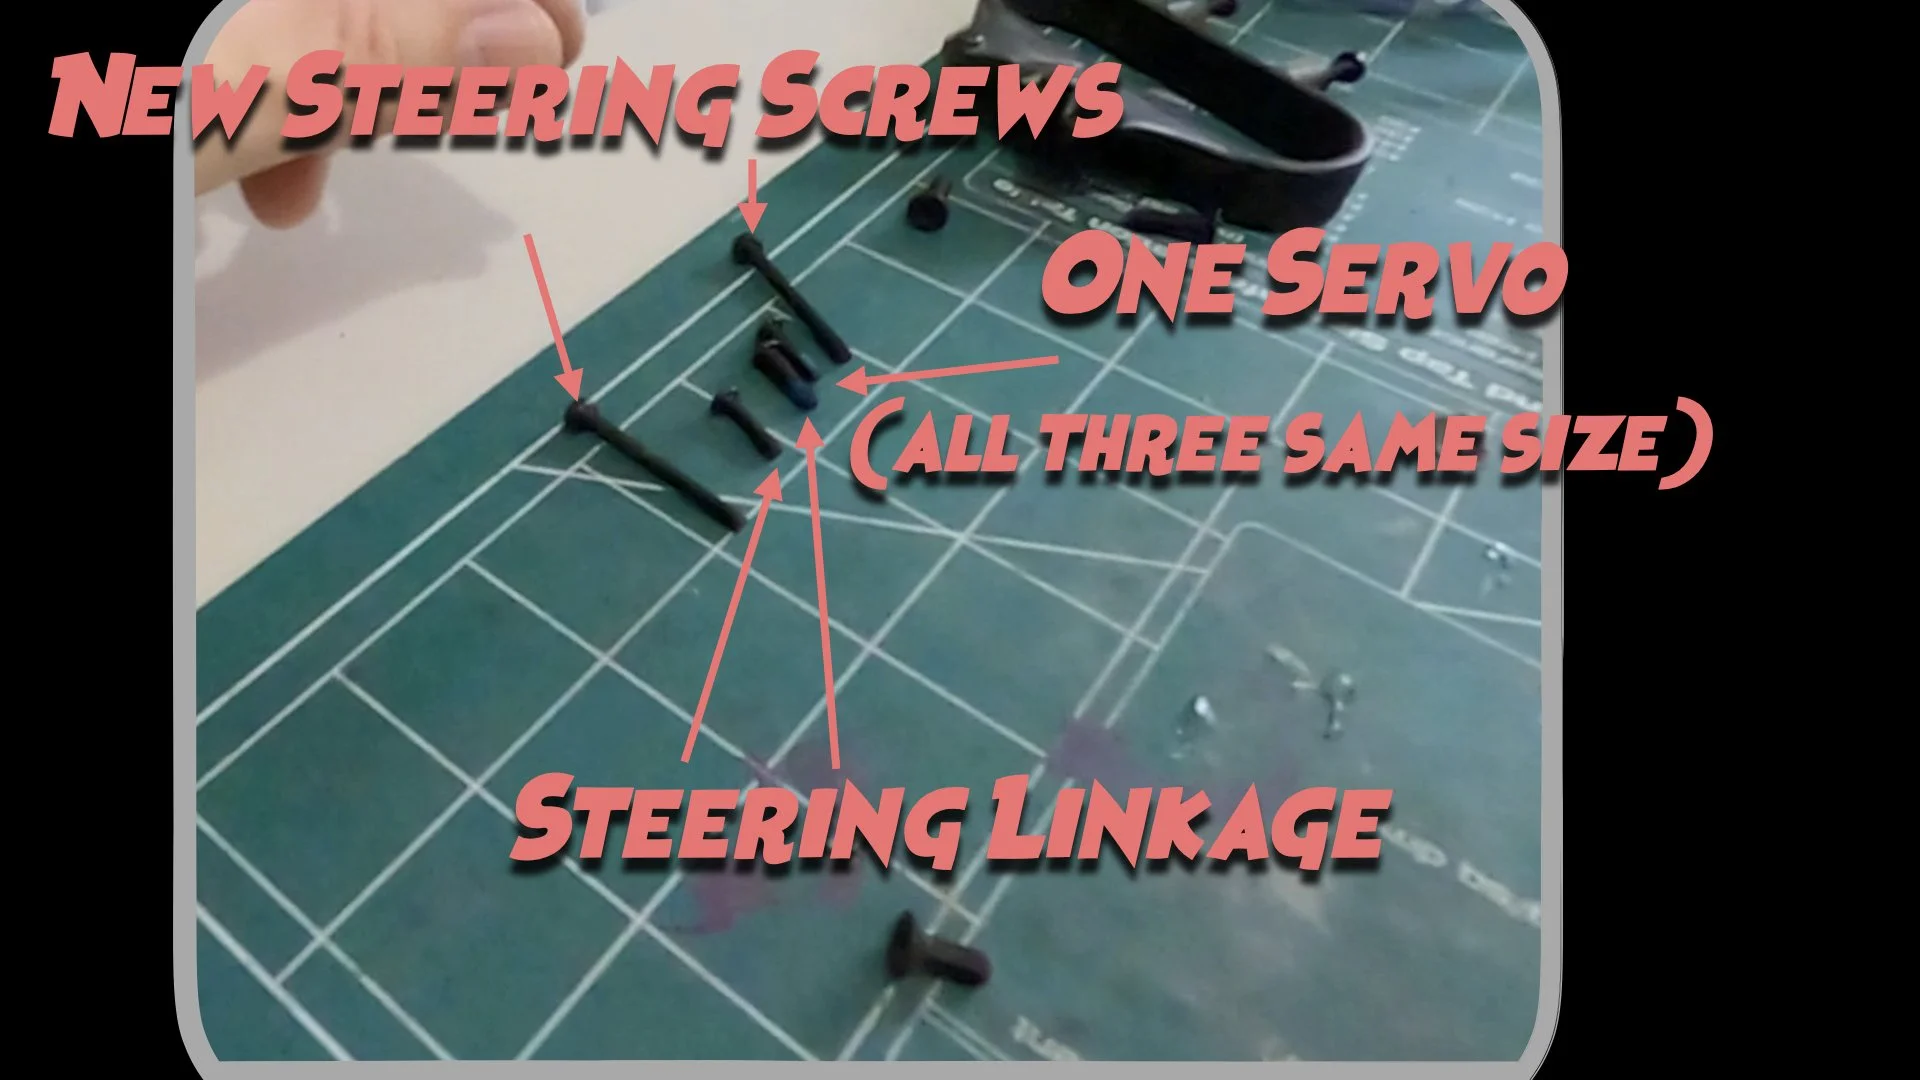
So, the first thing that I did was loosen the three screws on the top of the handle.
This way the plastic cover can be loose enough to life up. Then I took out the two screws for the bumper so that I could lift the whole thing out of the truck.
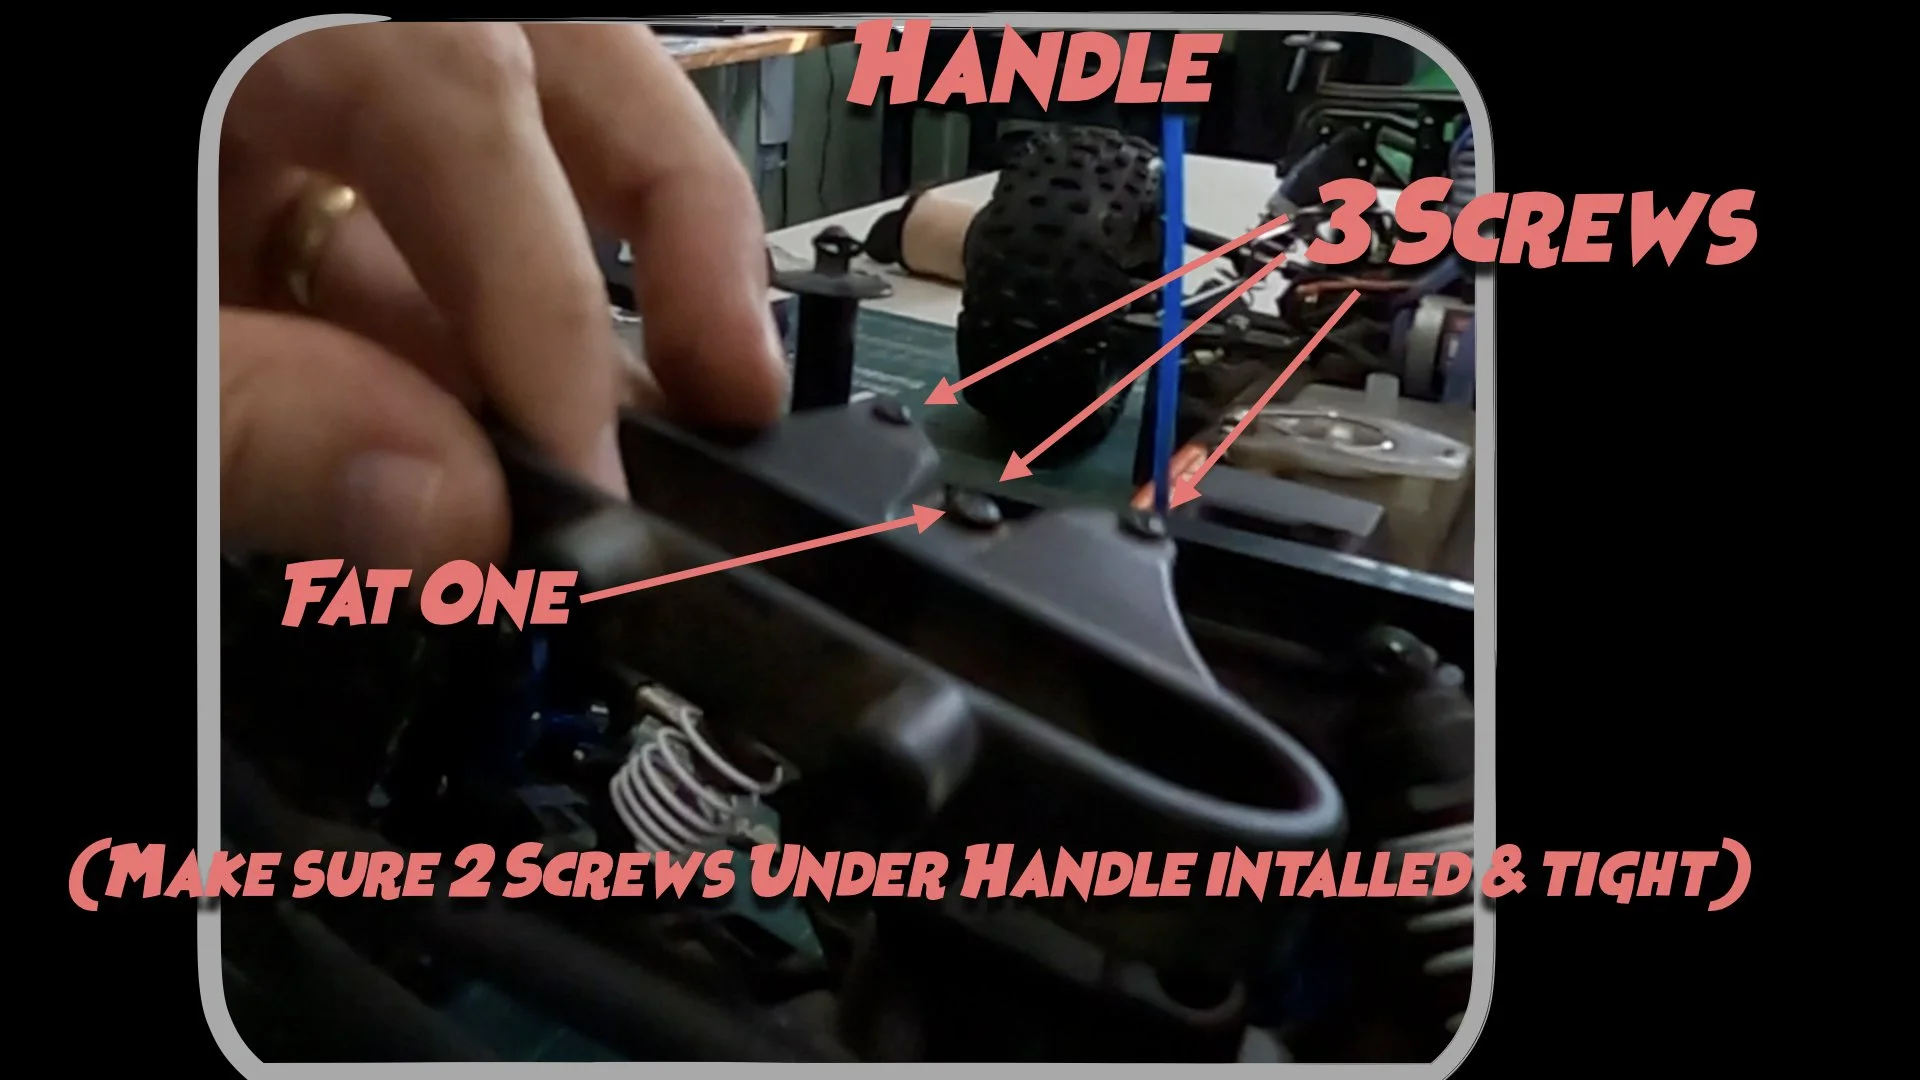
I removed the handle, and put the screws back in it on the table so I would remember where the screws went. There is a fat screw in the middle of the handle.
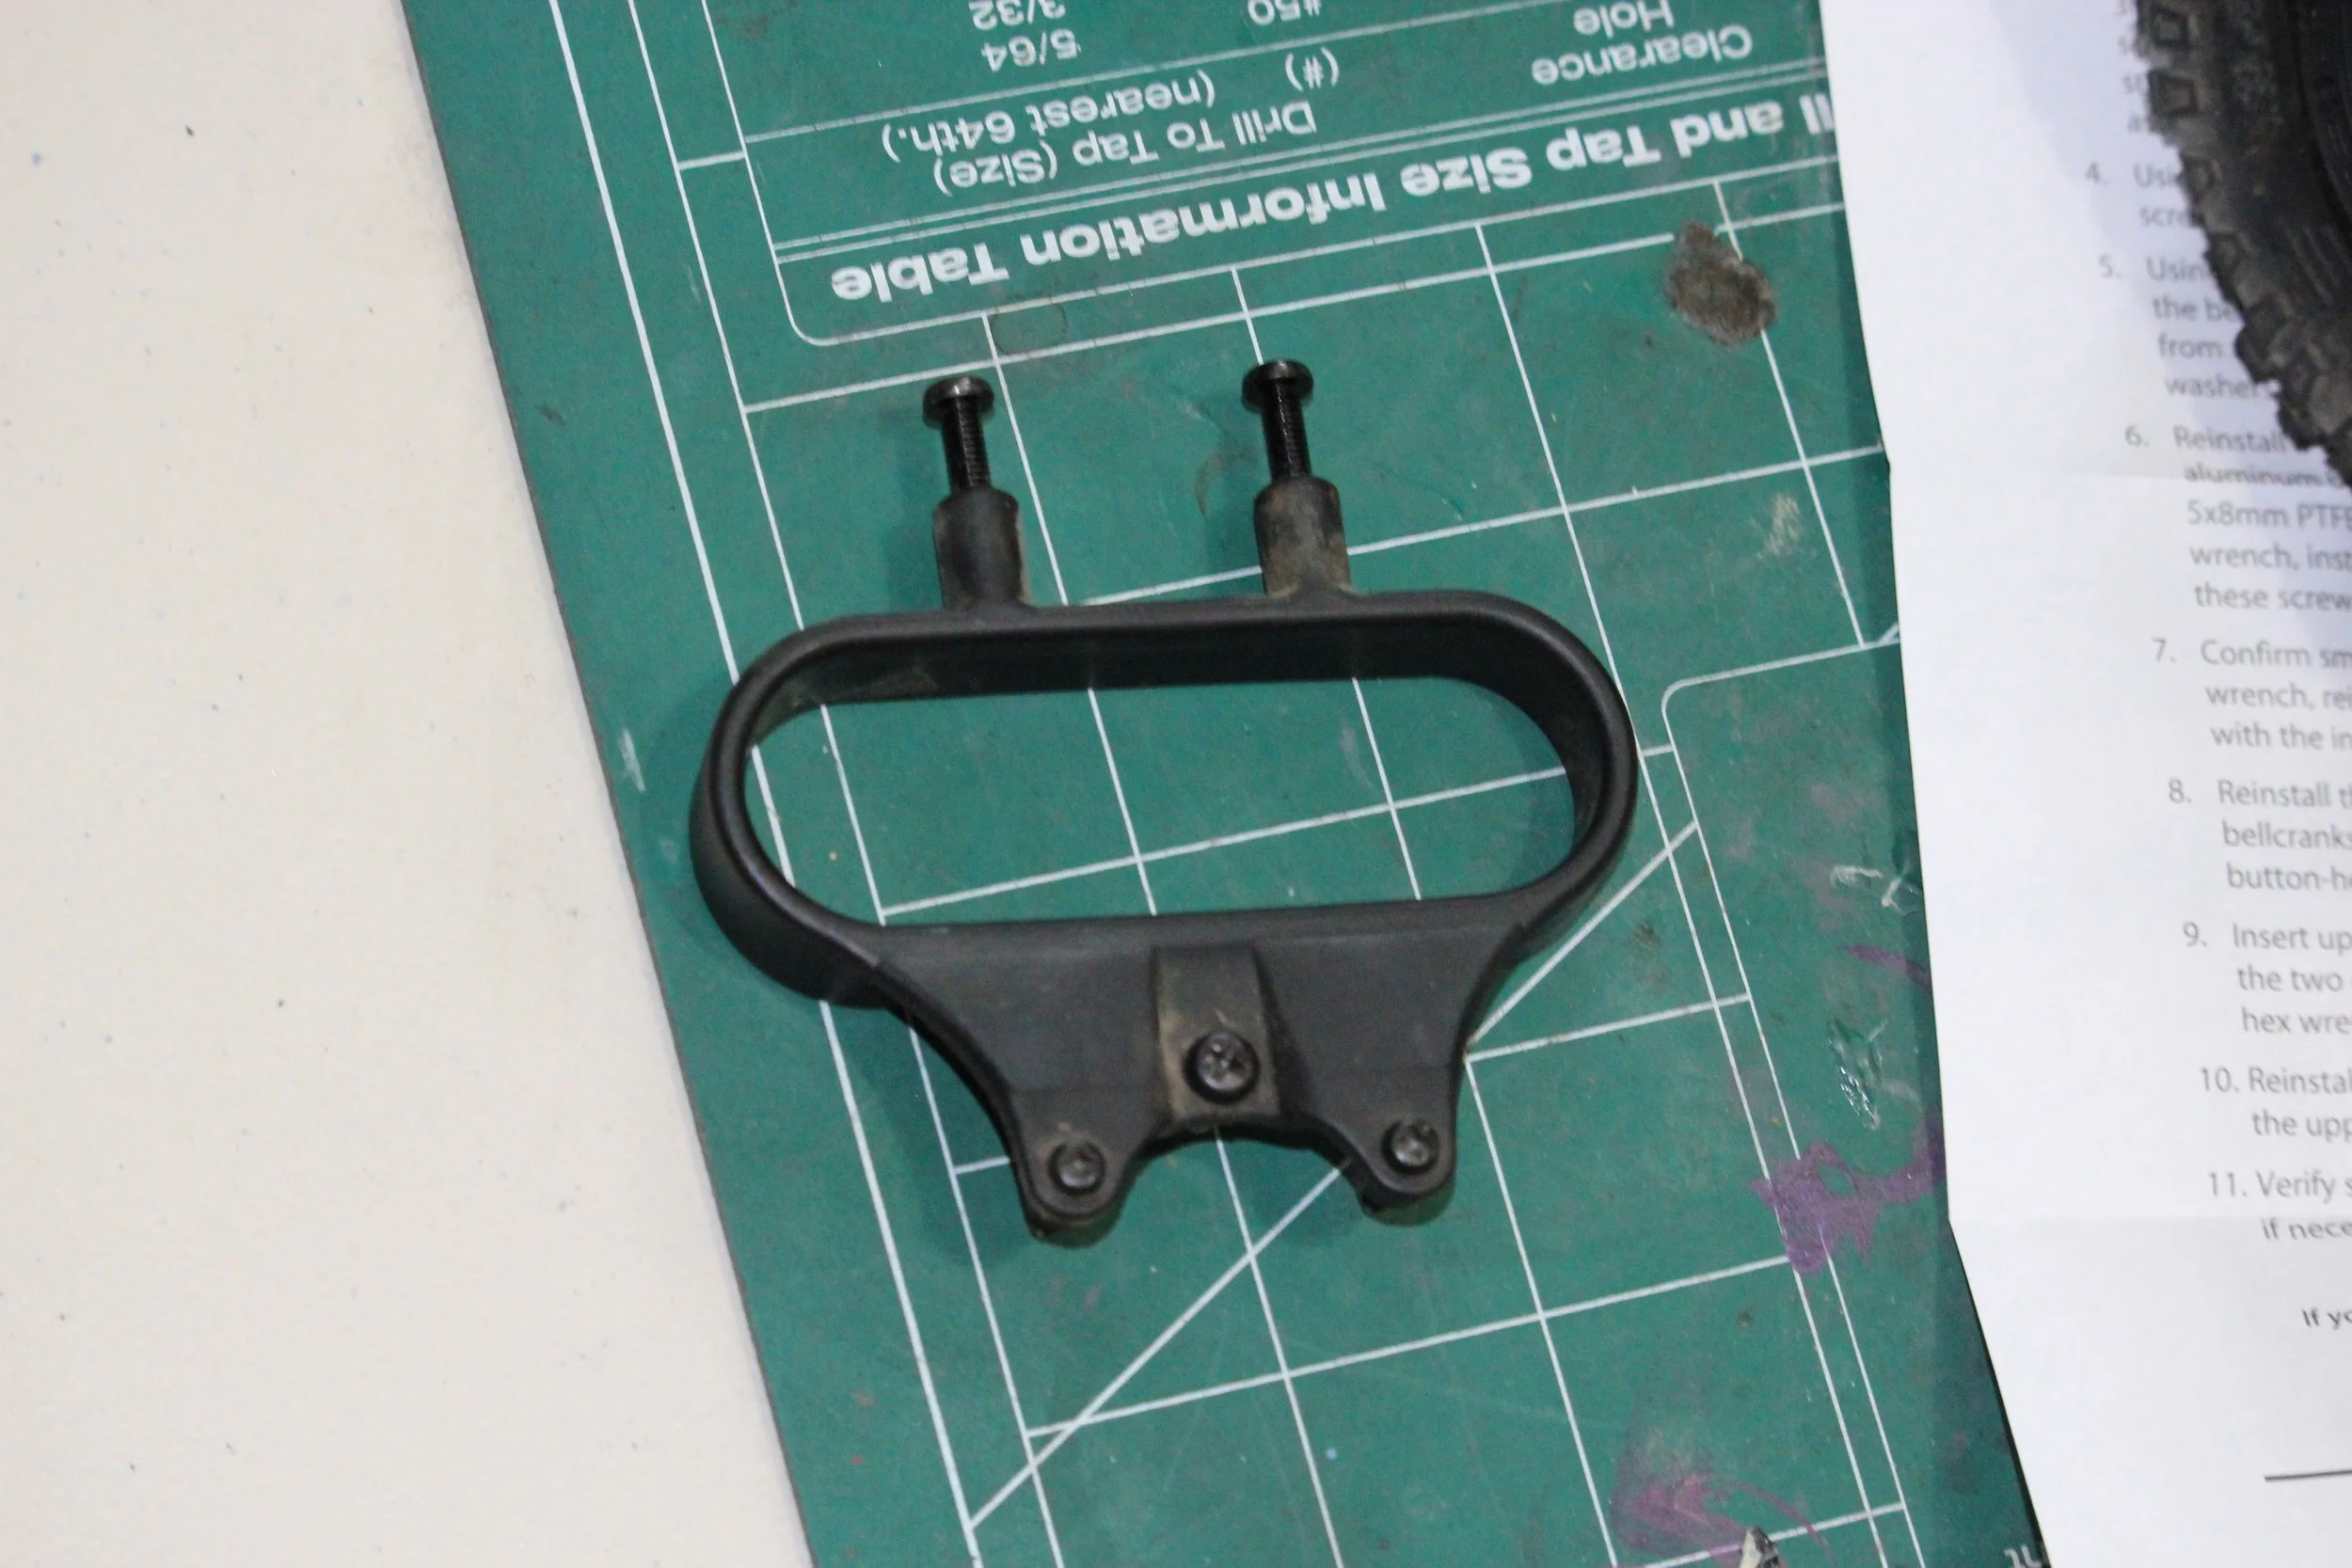
The next thing you want to do is pull out the two screws under the handle thing- a-mabobbie. I think that thing-a-mobbie the official part, or some might call it the handle. When you remove the handle, there are two screws under the handle. Once you get those screws out, the plastic starts to loosen up.

I went down the line and realized now that I could have just loosened the screws, just so there is some play to wiggle the steering out of the truck.
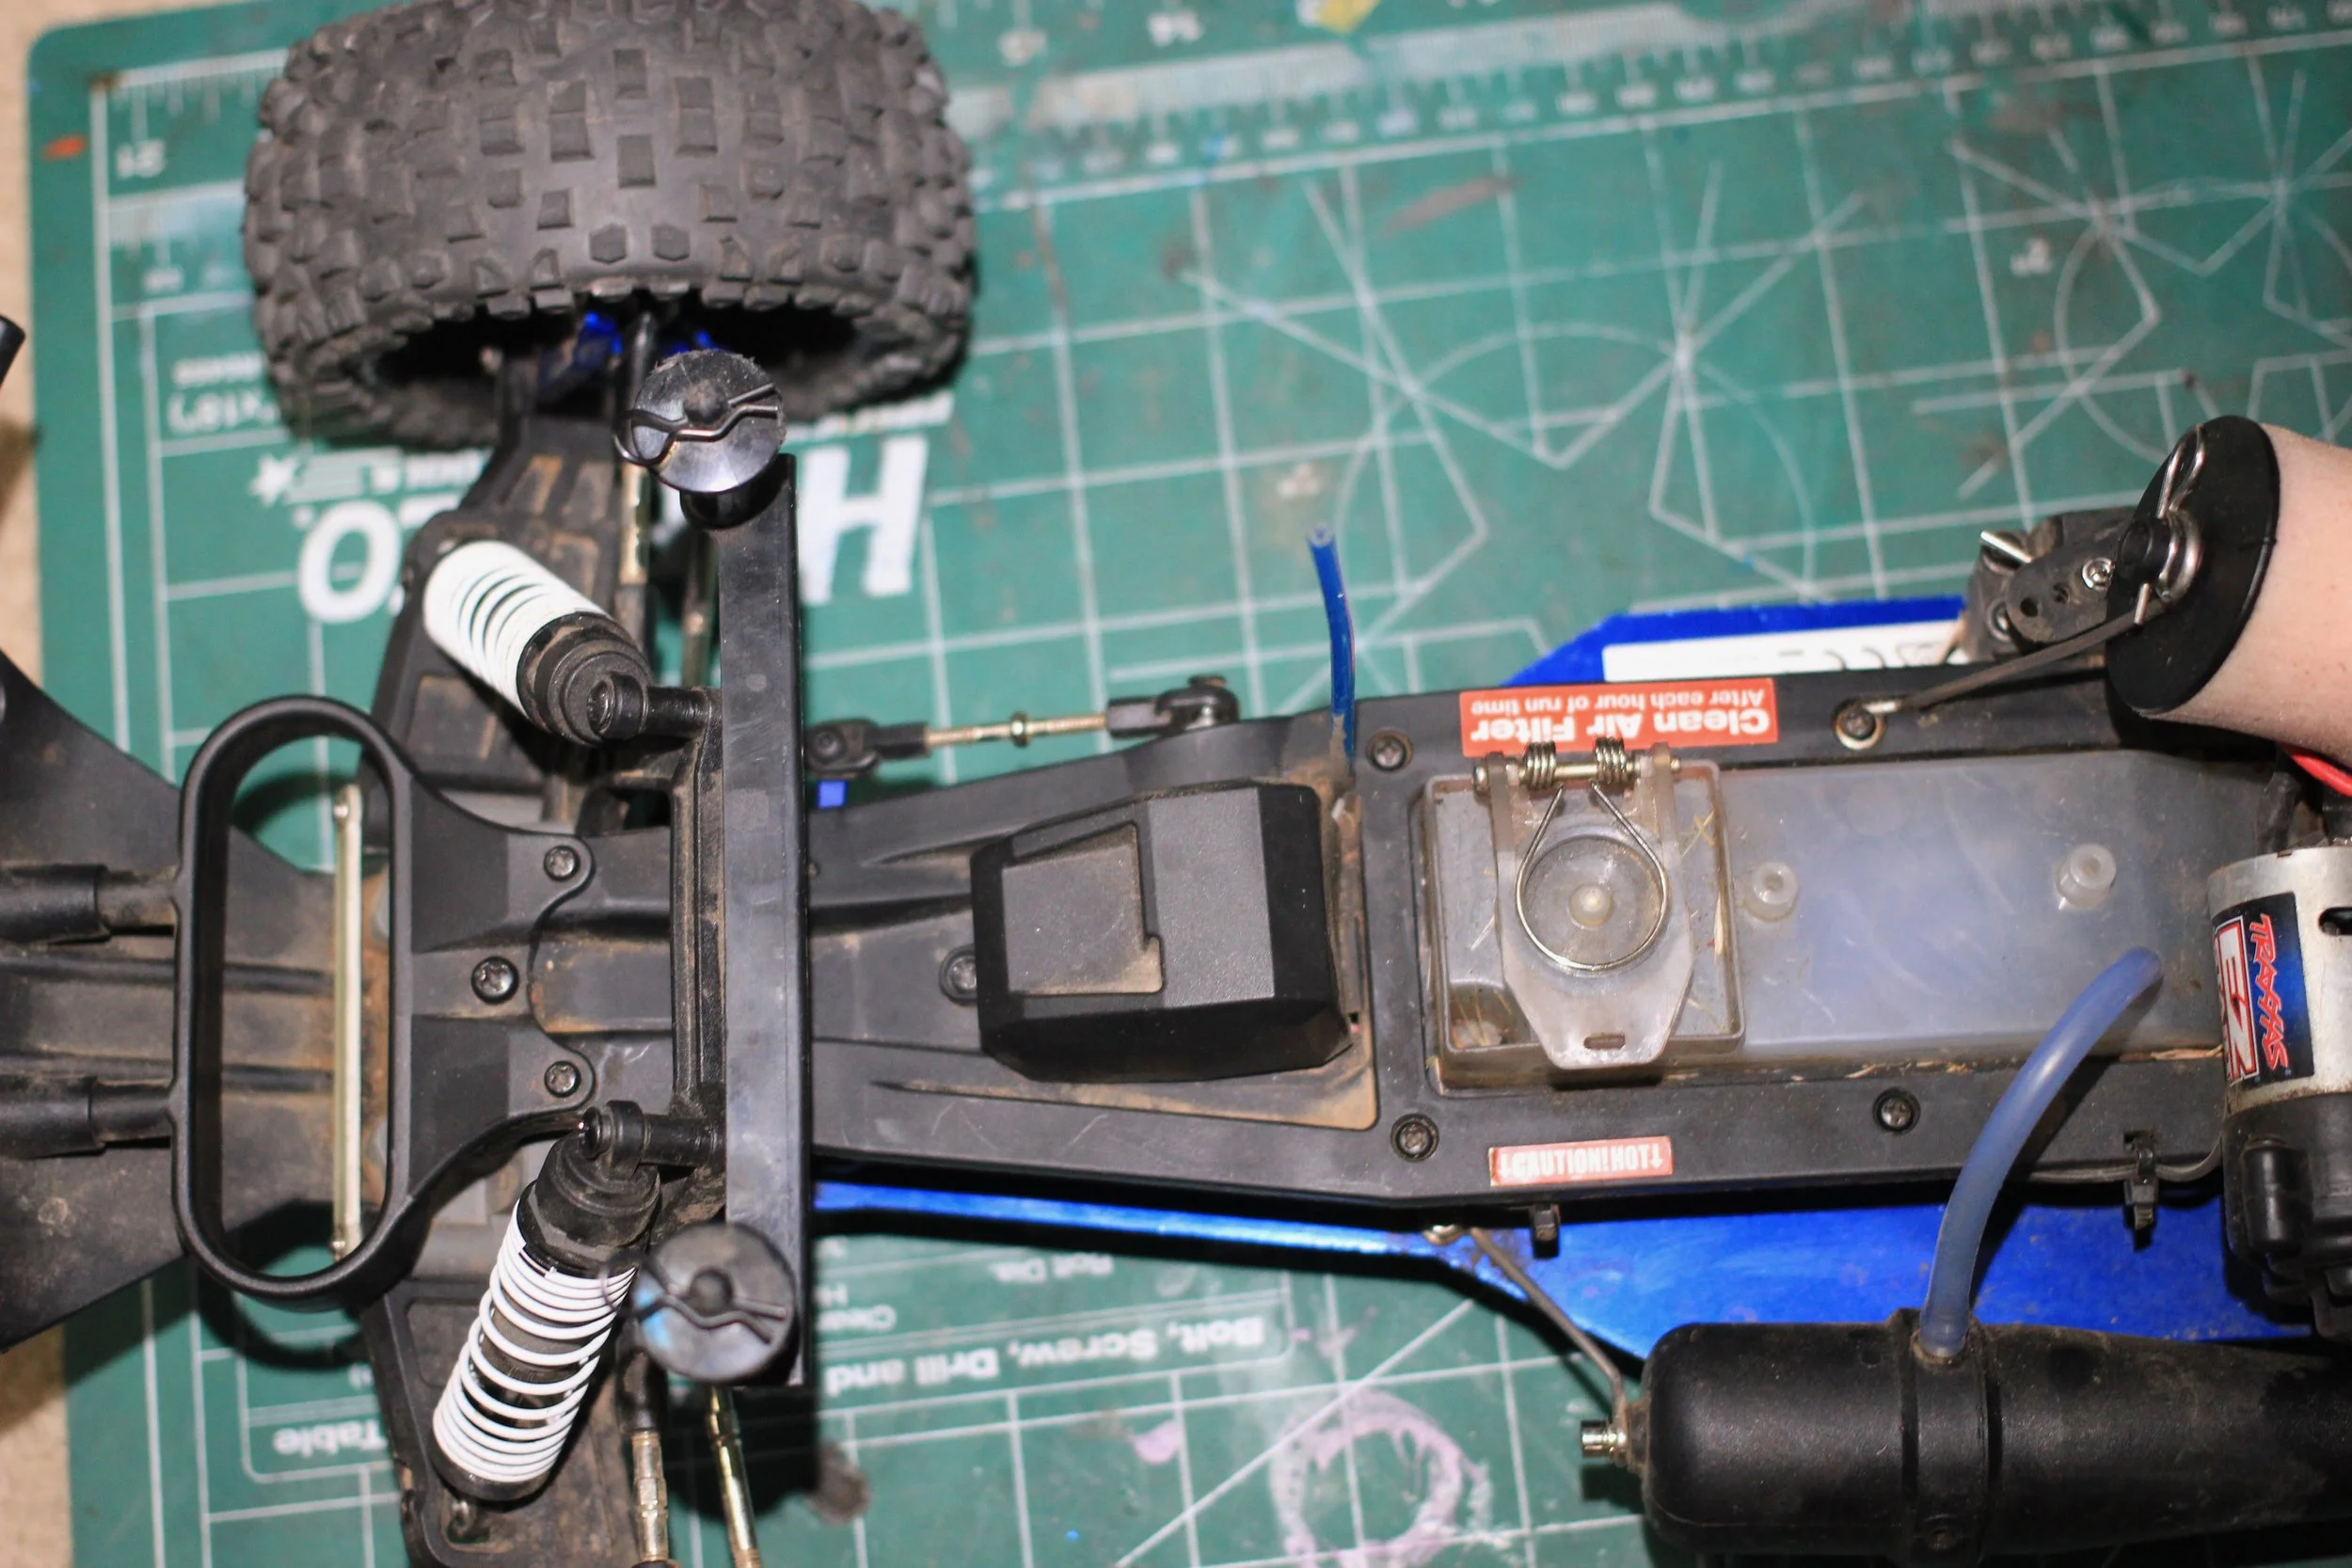
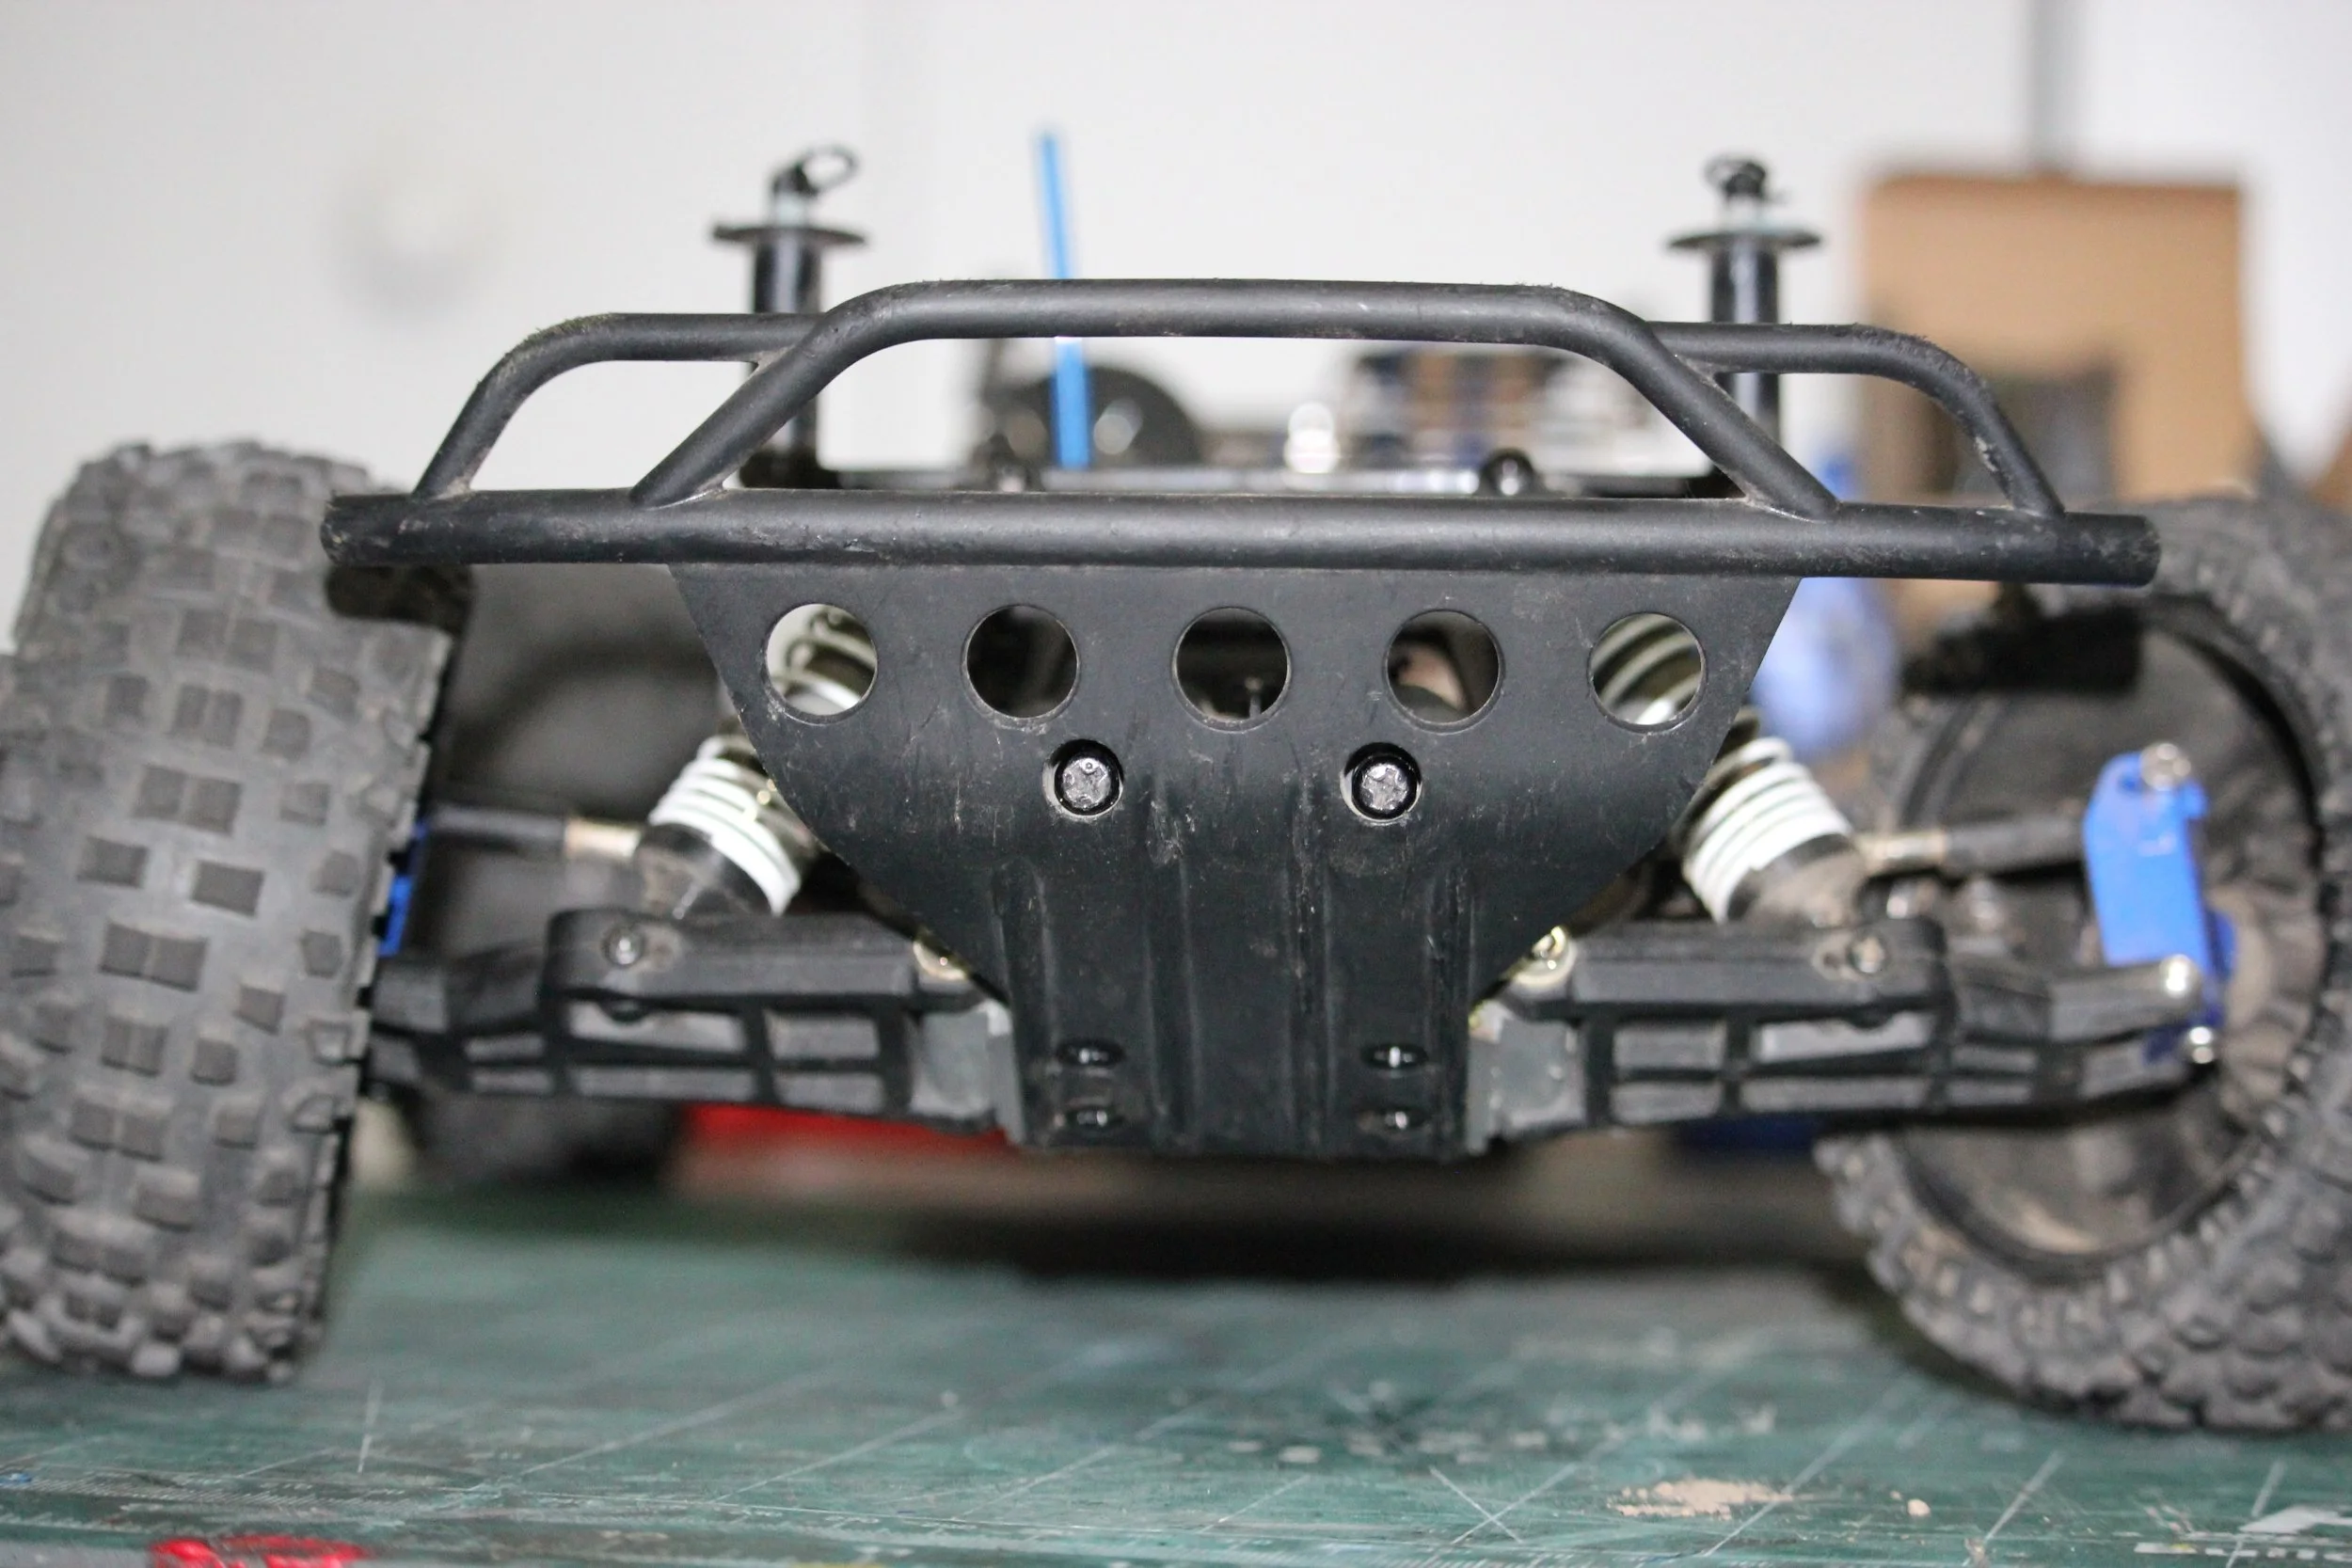
You just go back and forth down the line with the screws on the top of the plastic. I took the pic after assembling it. Ignore the handle. That SHOULD NOT be attached.
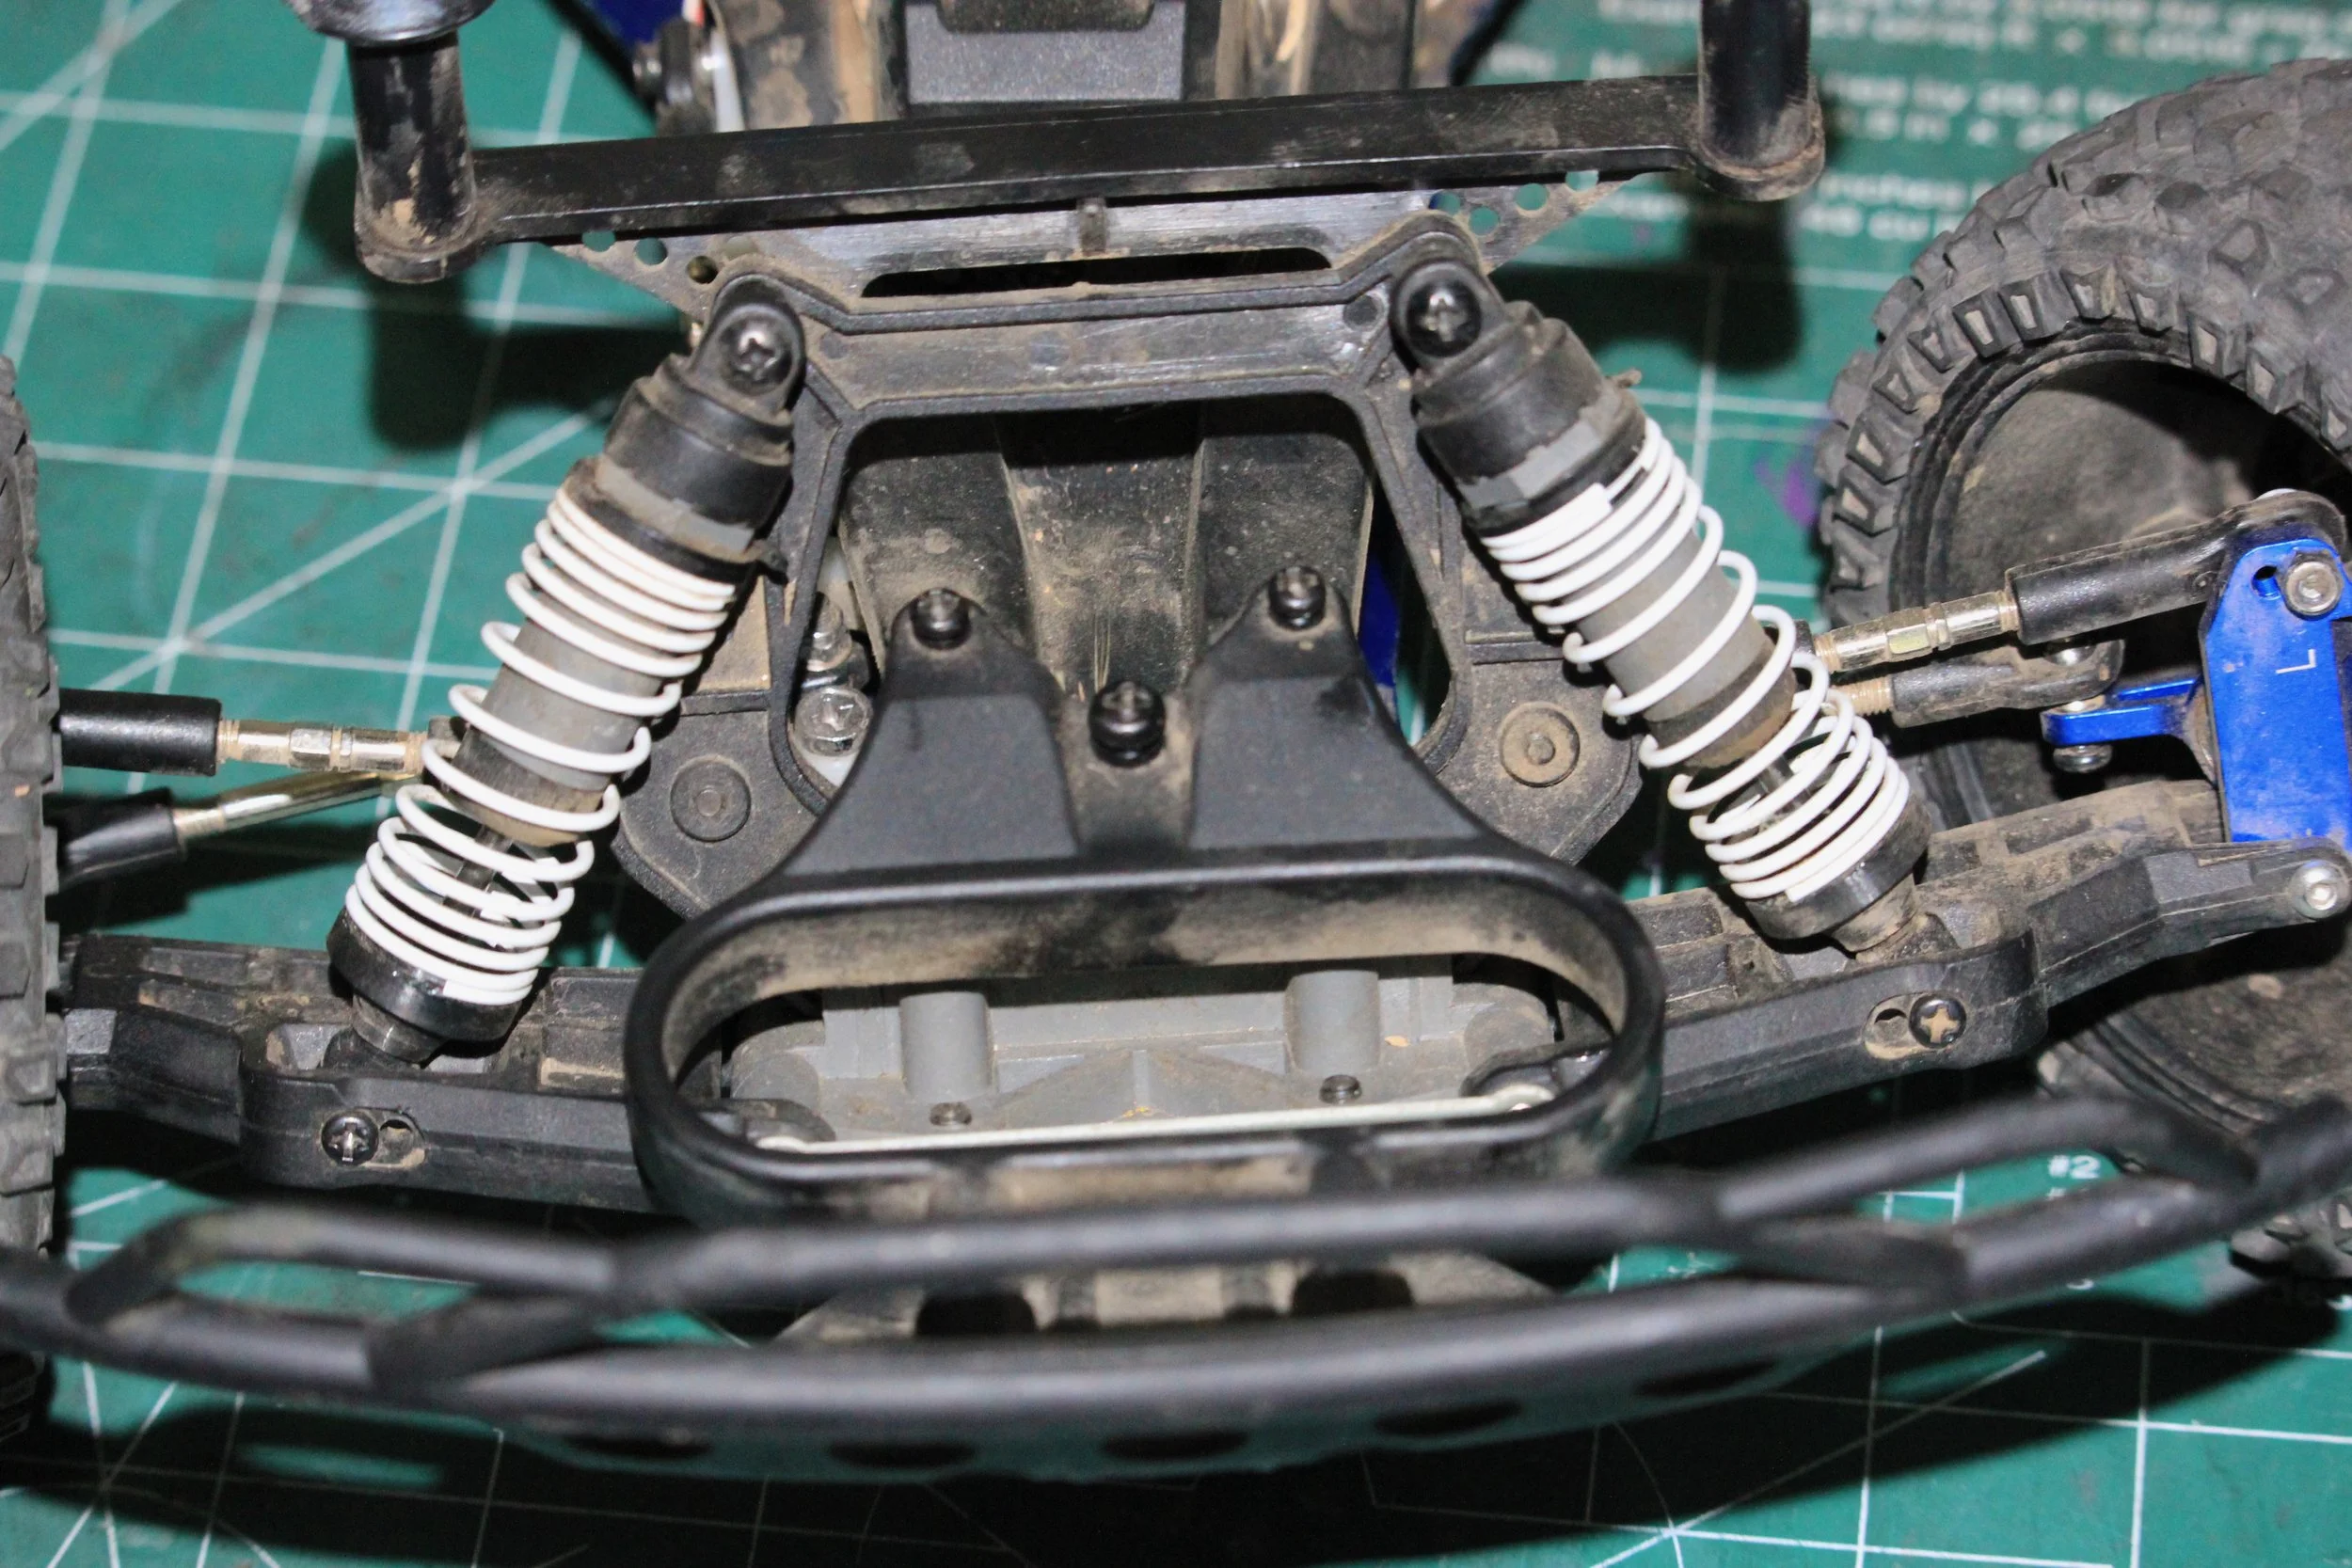
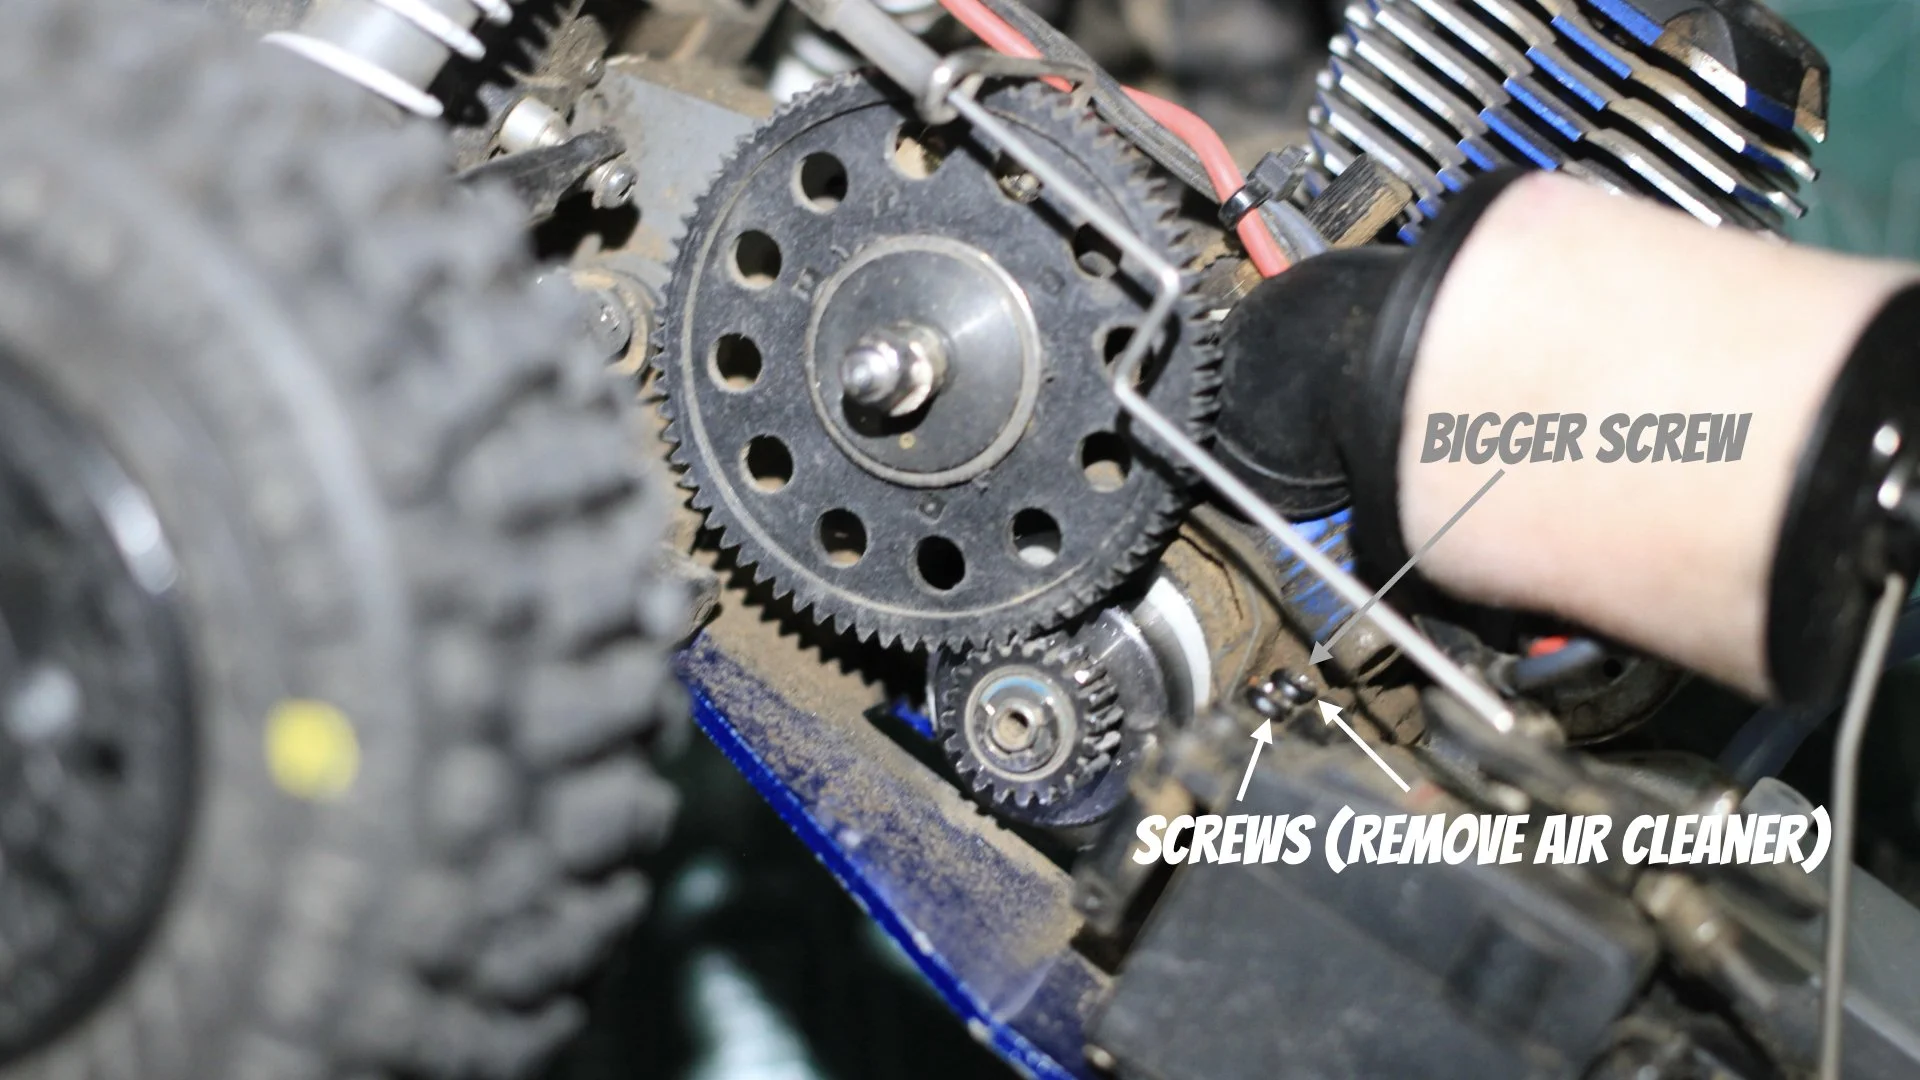
You also need to make sure that the screws are loose on the back of the chassis. Take note that there are two different sizes of screws in the back. You will have to completely remove the air cleaner to get to the screws. Once you remove the screws, the plastic should have enough give to get the steering out.
The big thing you want to do now is remove the scews for the steering, and remove the three screws that hold the bumper to the chassis. If you have lived a good life then you should be able to wiggle the steering loose from the chassis. Oh, make sure that you unscrew the servo horn from the steering; otherwise, you will probably call me bad names. I don’t like ringing ears, so remember to do that.
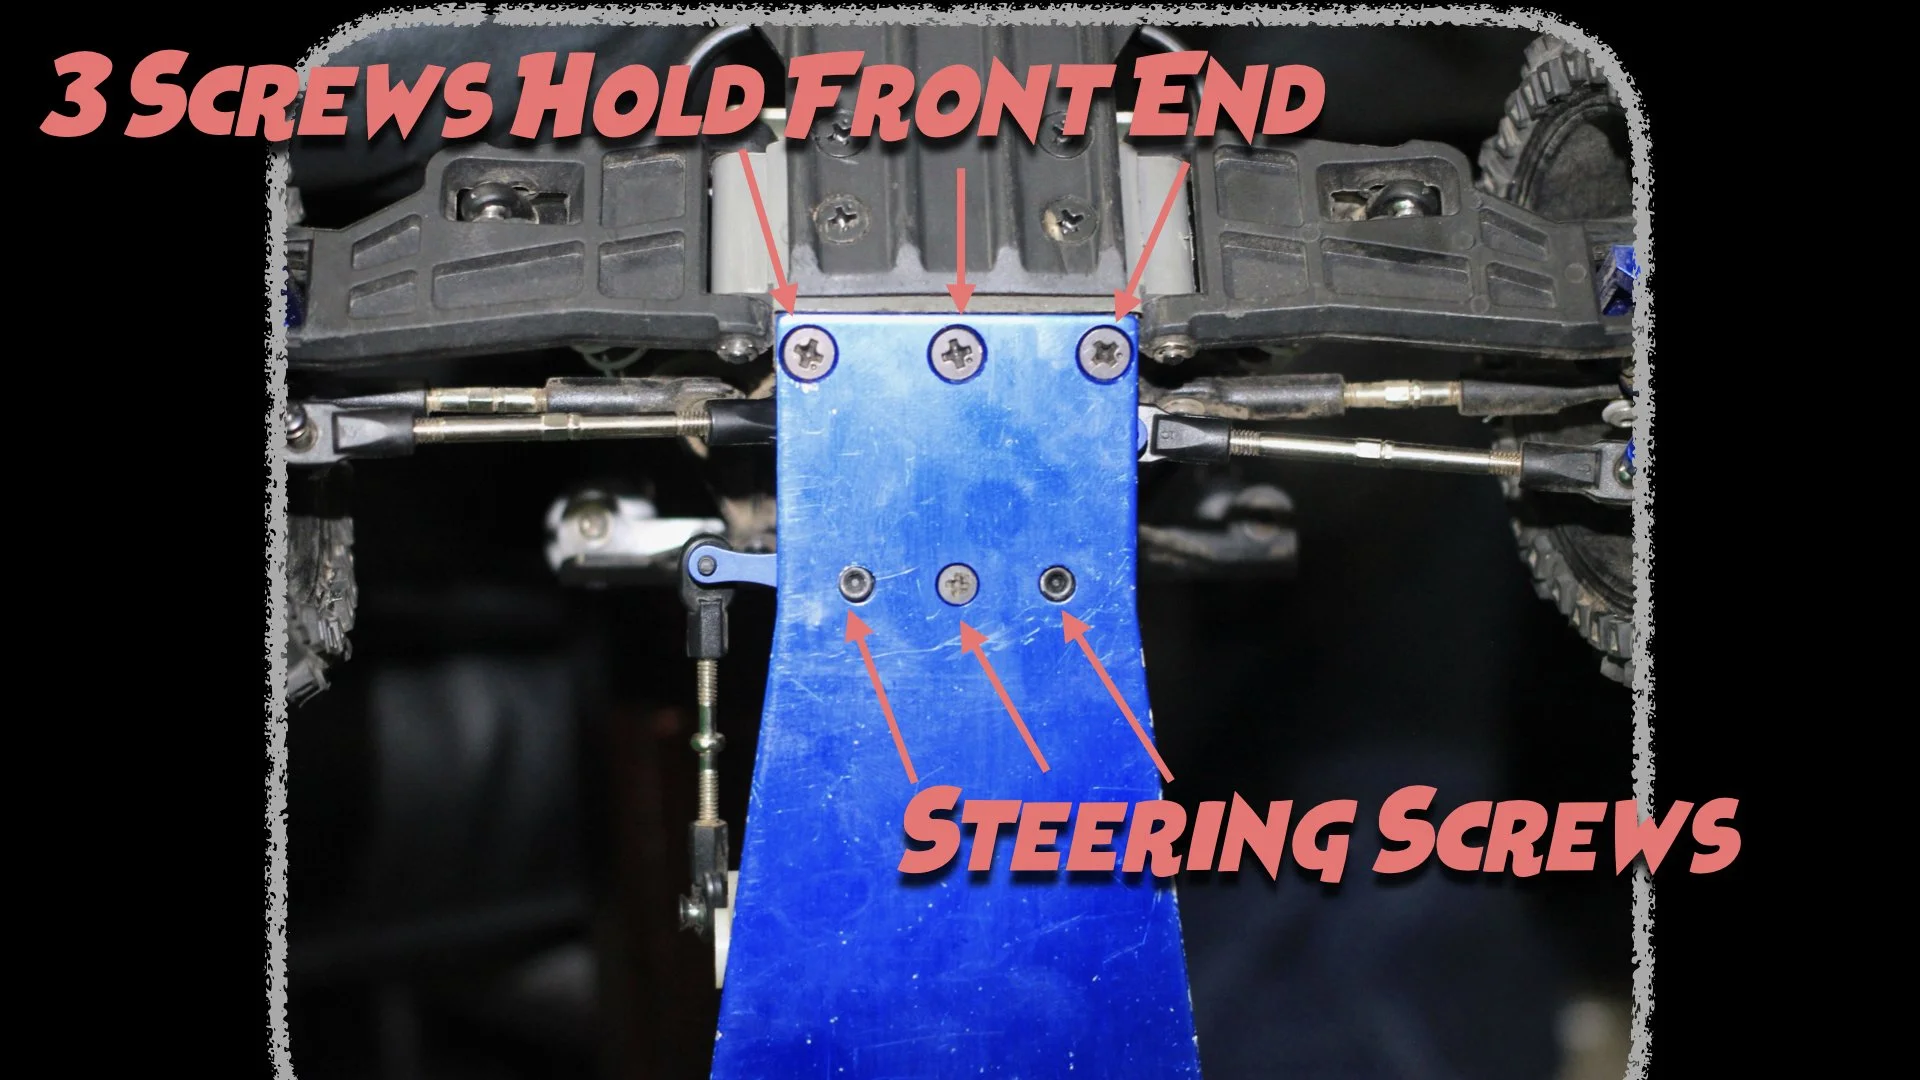
Once you loosen all the screws then the steering should be loose enough that you can wiggle the steering out. The Phillips head in the center is what holds the steering to the chassis.
Once you get that loose, you can attach the new steering to the front. Trust me, you will feel like you are doing the hokey pokey, but it should wiggle out. Now, when you put in the new steering, make sure you take note of the new screws verses the old screws. The new screws that hold the steering to the steering posts are a little shorter. Also, make sure that when you tighten then up that you do not lose the ball bearings. The old steering had plastic bushings.

You can see the new screws are smaller than the new ones
The new steering comes with all the new screws. They will thread into the machined holes and they come with Lock Tite already.
Then you start wiggling it back into place, and easiest when you get the steering attached to the steering posts. Also, make sure that the ball bearings do not drop out…. Don’t ask me how I know. Am I starting to repeat myself now? Once you get that all together, you can just go around and tighten everything down. The truck should be ready to run. Make sure you give the steering a bit of a turn back and forth to make sure nothing is binding. It would be sad to go through all the work, drive the truck, and then crash it into something because the steering croaked.
Conclusion
The video below should shed some light on this project as well. If you want to support the site, I recommend the iFixit toolkit. You get a good kit, and I get clams. Personally, I want to get back to bashing and finding a good place to drive my truck. I rate this truck at an 80,000 mile Rover. It is almost at the 100,000-mile point where the bugs are worked out of it. My friends always told me to buy Rover’s used because once you get the bugs worked out of them, then they go anywhere. I always remind them that my anxiety is not leaving home, but whether or not I can get back home in a Rover. Yeah, they don’t find that funny either, but I still chuckle about it.
If I did not want a rear wheel drive short-course truck so badly, then I probably would have gone for a Kyosho buggy. However, I am having a lot of fun making this Slash more robust. This truck is a few upgrades from being a qualified Paulie’s pick. I have a servo to install for the throttle next. I think that will bring the truck up to the 85,000 mile reliability status. I guess a stage 3 tune for a nitro Slash is: Steering, servos, and tires. I think that stage 4 is the commitment to a new carb.
Thanks for reading the blog and watching the video. Was there a step that I forgot to mention? Did you use a different steering option for the Slash? Let us know in the comments. If you like the blog and don’t want to buy through Amazon, feel free to buy me a coffee. I promise to squander the money on RC stuff or this blog!
Until next time, get out, have some fun, look for opportunities to be generous even if it is with your time or skill, and until we meet again, may the Lord’s blessing and peace be upon you.