
Proline Body Mounts
I am a sucker for gizmos and upgrades just to upgrade. I bought a slash body for my Nitro Slash, and it chapped my hide that the body did not fit. I painted it, and it looked good for a basher body. I know I bought the truck used, but it’s not like this is a this is a 50 year old squeezing into skinny jeans. Is that still a thing? I hope that trend has been blotted out forever, and removed from the history books. No need for anyone to relive that. Anyhoo… I bought the body for a Traxxas Slash, and it does not really fit the Nitro Slash that well. So, I found this proline body mount kit that is supposed to make the body mounts adjustable. So, do they work? Yes, they work, but don’t expect to make adjustments to the body mounts on the fly.
What’s in the Kit?
The kit comes with two plastic braces for the back and a plastic brace for the front. One thing that I noticed is that if you put the rear brace all the way down, you will lock up the rear suspension. That sort of ticked me off. Then I adjusted the linkage, and the kit started to grow on me, well, not literally that would be weird, but it is here, so it has become a Paulie’s Pick. The kit will make it pretty nice to swap out different bodies. For instance, I love Volkswagen Baja Bugs and want to paint one like a bumblebee. Guess what? Proline has a VW Beetle body for the slash. Rear wheel drive? Nitro?
Anyway, back to what is in the kit….
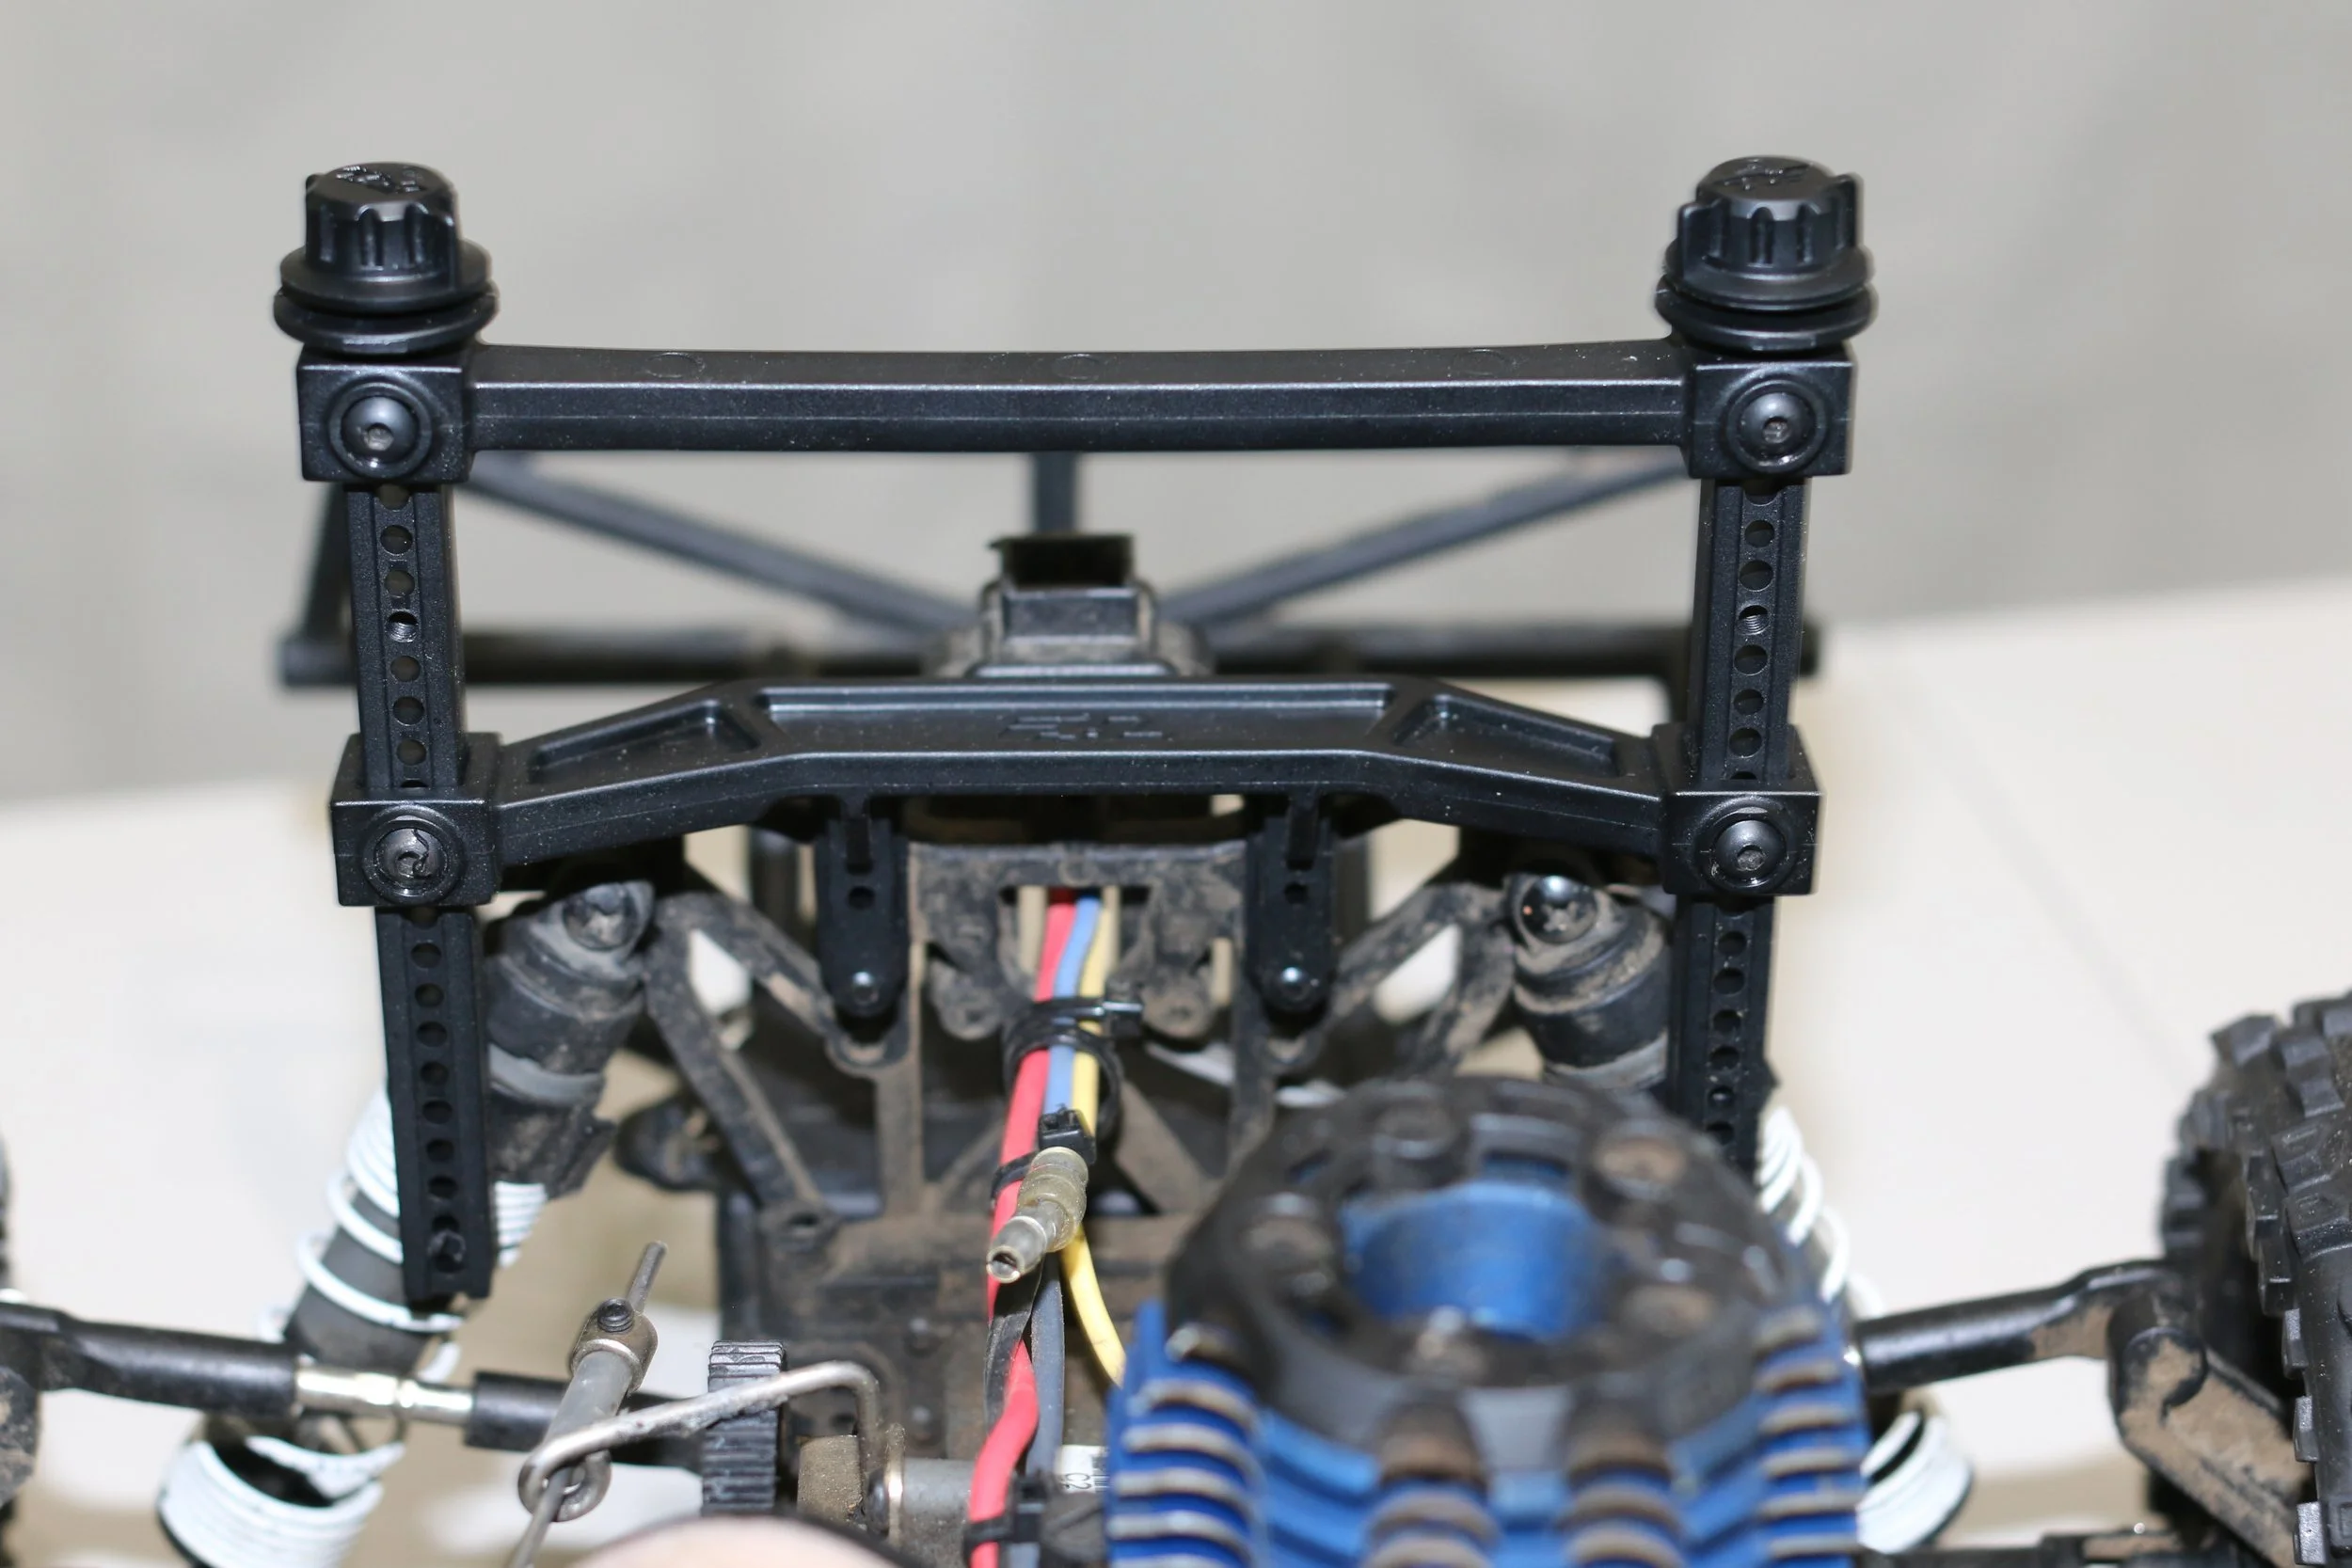
The screws for the body mounts on top of the posts make for easy body removal and replacement
The top screws and the caps.
The plastic thinga-ma-bobbies that go up and down (official name by the way. Yeah, I thought it was weird too), or maybe they are the Body Posts. I guess you can decide, but I’m sticking with my terms.
What’s Good?
I like the caps. I love how this system works. Yes, the plastic is a bit flimsy, but you want the plastic to have some give to it. If the plastic is too rigid well, then you just end up in therapy and have to learn to relax. Or when you cartwheel the truck the first time, and you will snap the plastic. Yes, these things have a tendency to cartwheel just when you find the limit. Either way it can end up being a bad day and you have to buy body posts. So, don’t see the flimsy plastic as accidental. You want the posts to flex and have some give. Honestly, the new posts feel sturdy enough to take a roll, and live on to fight another war…. or another bash.
The other nice thing about the plastic having some give is the posts have enough give to line up body holes. You can move the posts back and forth quite a bit to get the holes centered. The skinny threaded tops make it really easy to pop them through the body holes. So, once you get everything mounted, the system is pretty slick. Trust me, this is how I got the Slash body on the Slash chassis. Did I mention that Traxxas makes the truck AND the body, and they don’t play nice together? Weird right? You would think that a Traxxas body would just slip right onto a Traxxas chassis. Okay, I probably need to get over it.
I like that these are adjustable for the up and down movement. This allows for more than one body per RC vehicle. You don’t need to change out your body posts, but just remove two or four screws, depending on how much adjustment is needed. I grant the body posts are not a huge expense, but It is not like this is a huge expense, but you have to remember where you put them. That is a big issue for me as I tend to lose things. Now, I know, this is the epitome of first-world problems, and in the grand scheme of things, it is not the end of the world. However, if you want to drive your car with a particular body, and then the body does not fit. Well, that sort of sucks to be honest.
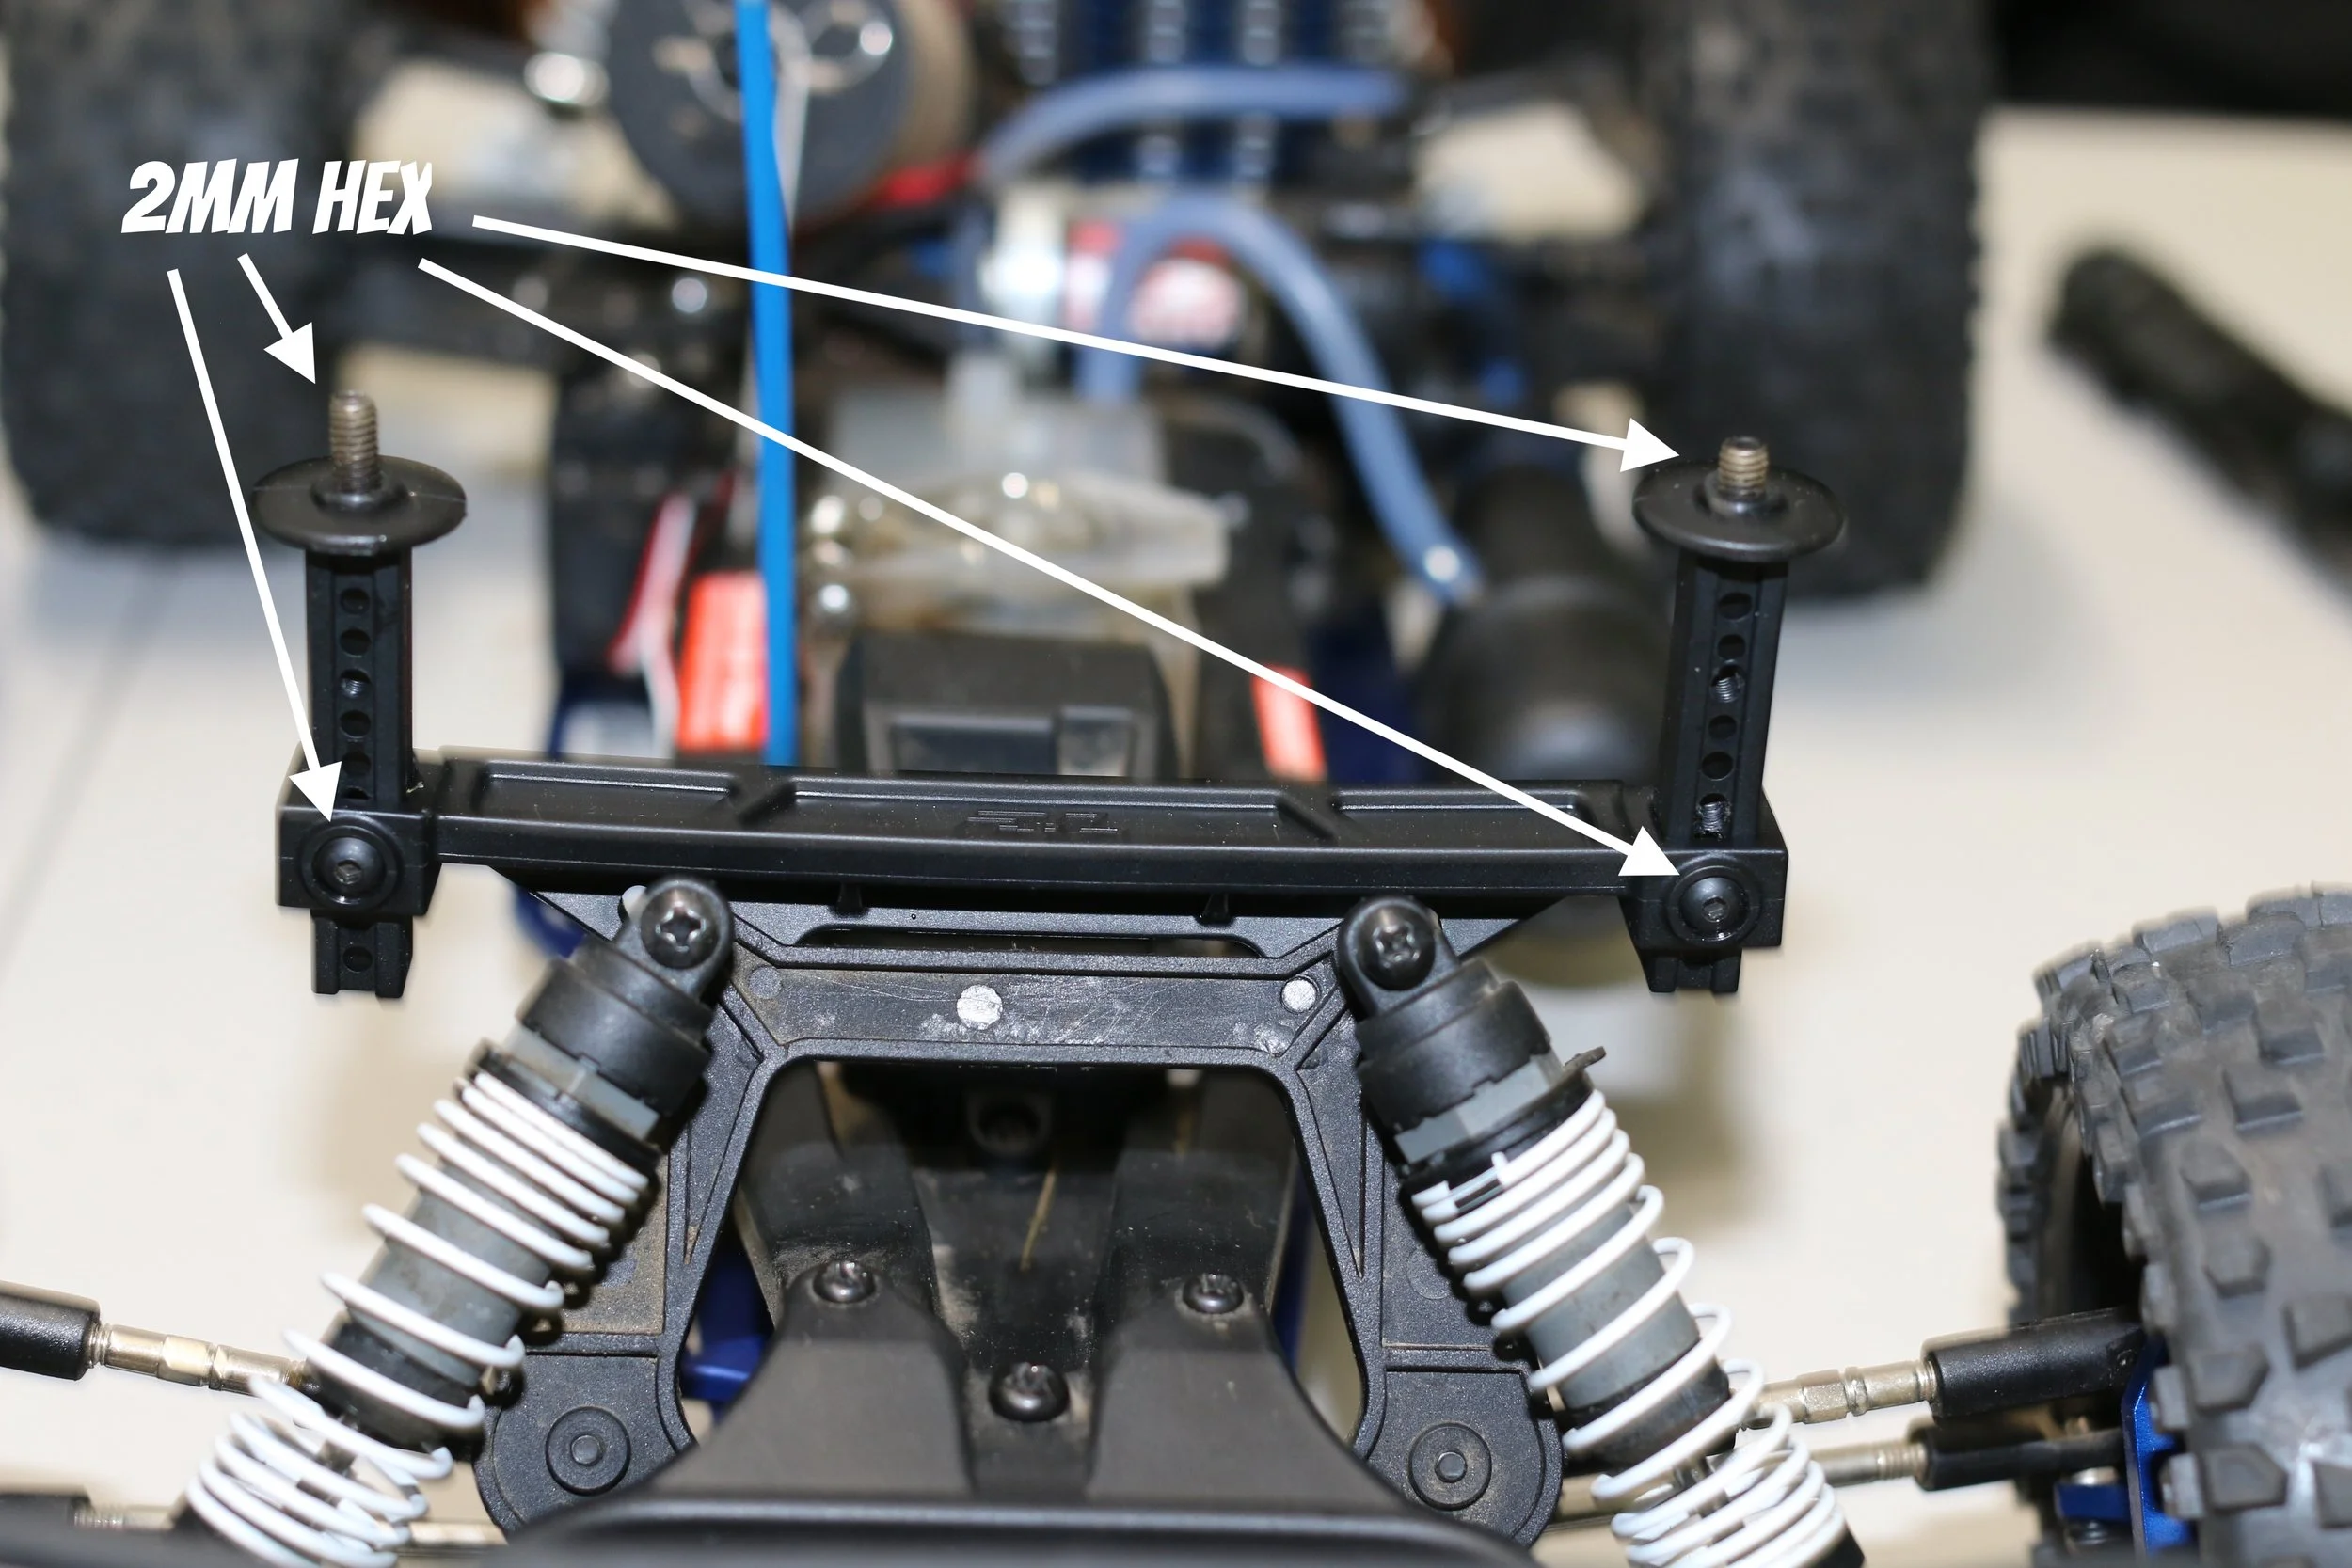
The consistent 2mm hex key! I love it! You only need one driver to get the kit installed. You will need to reuse the Traxxas Philips head screws.
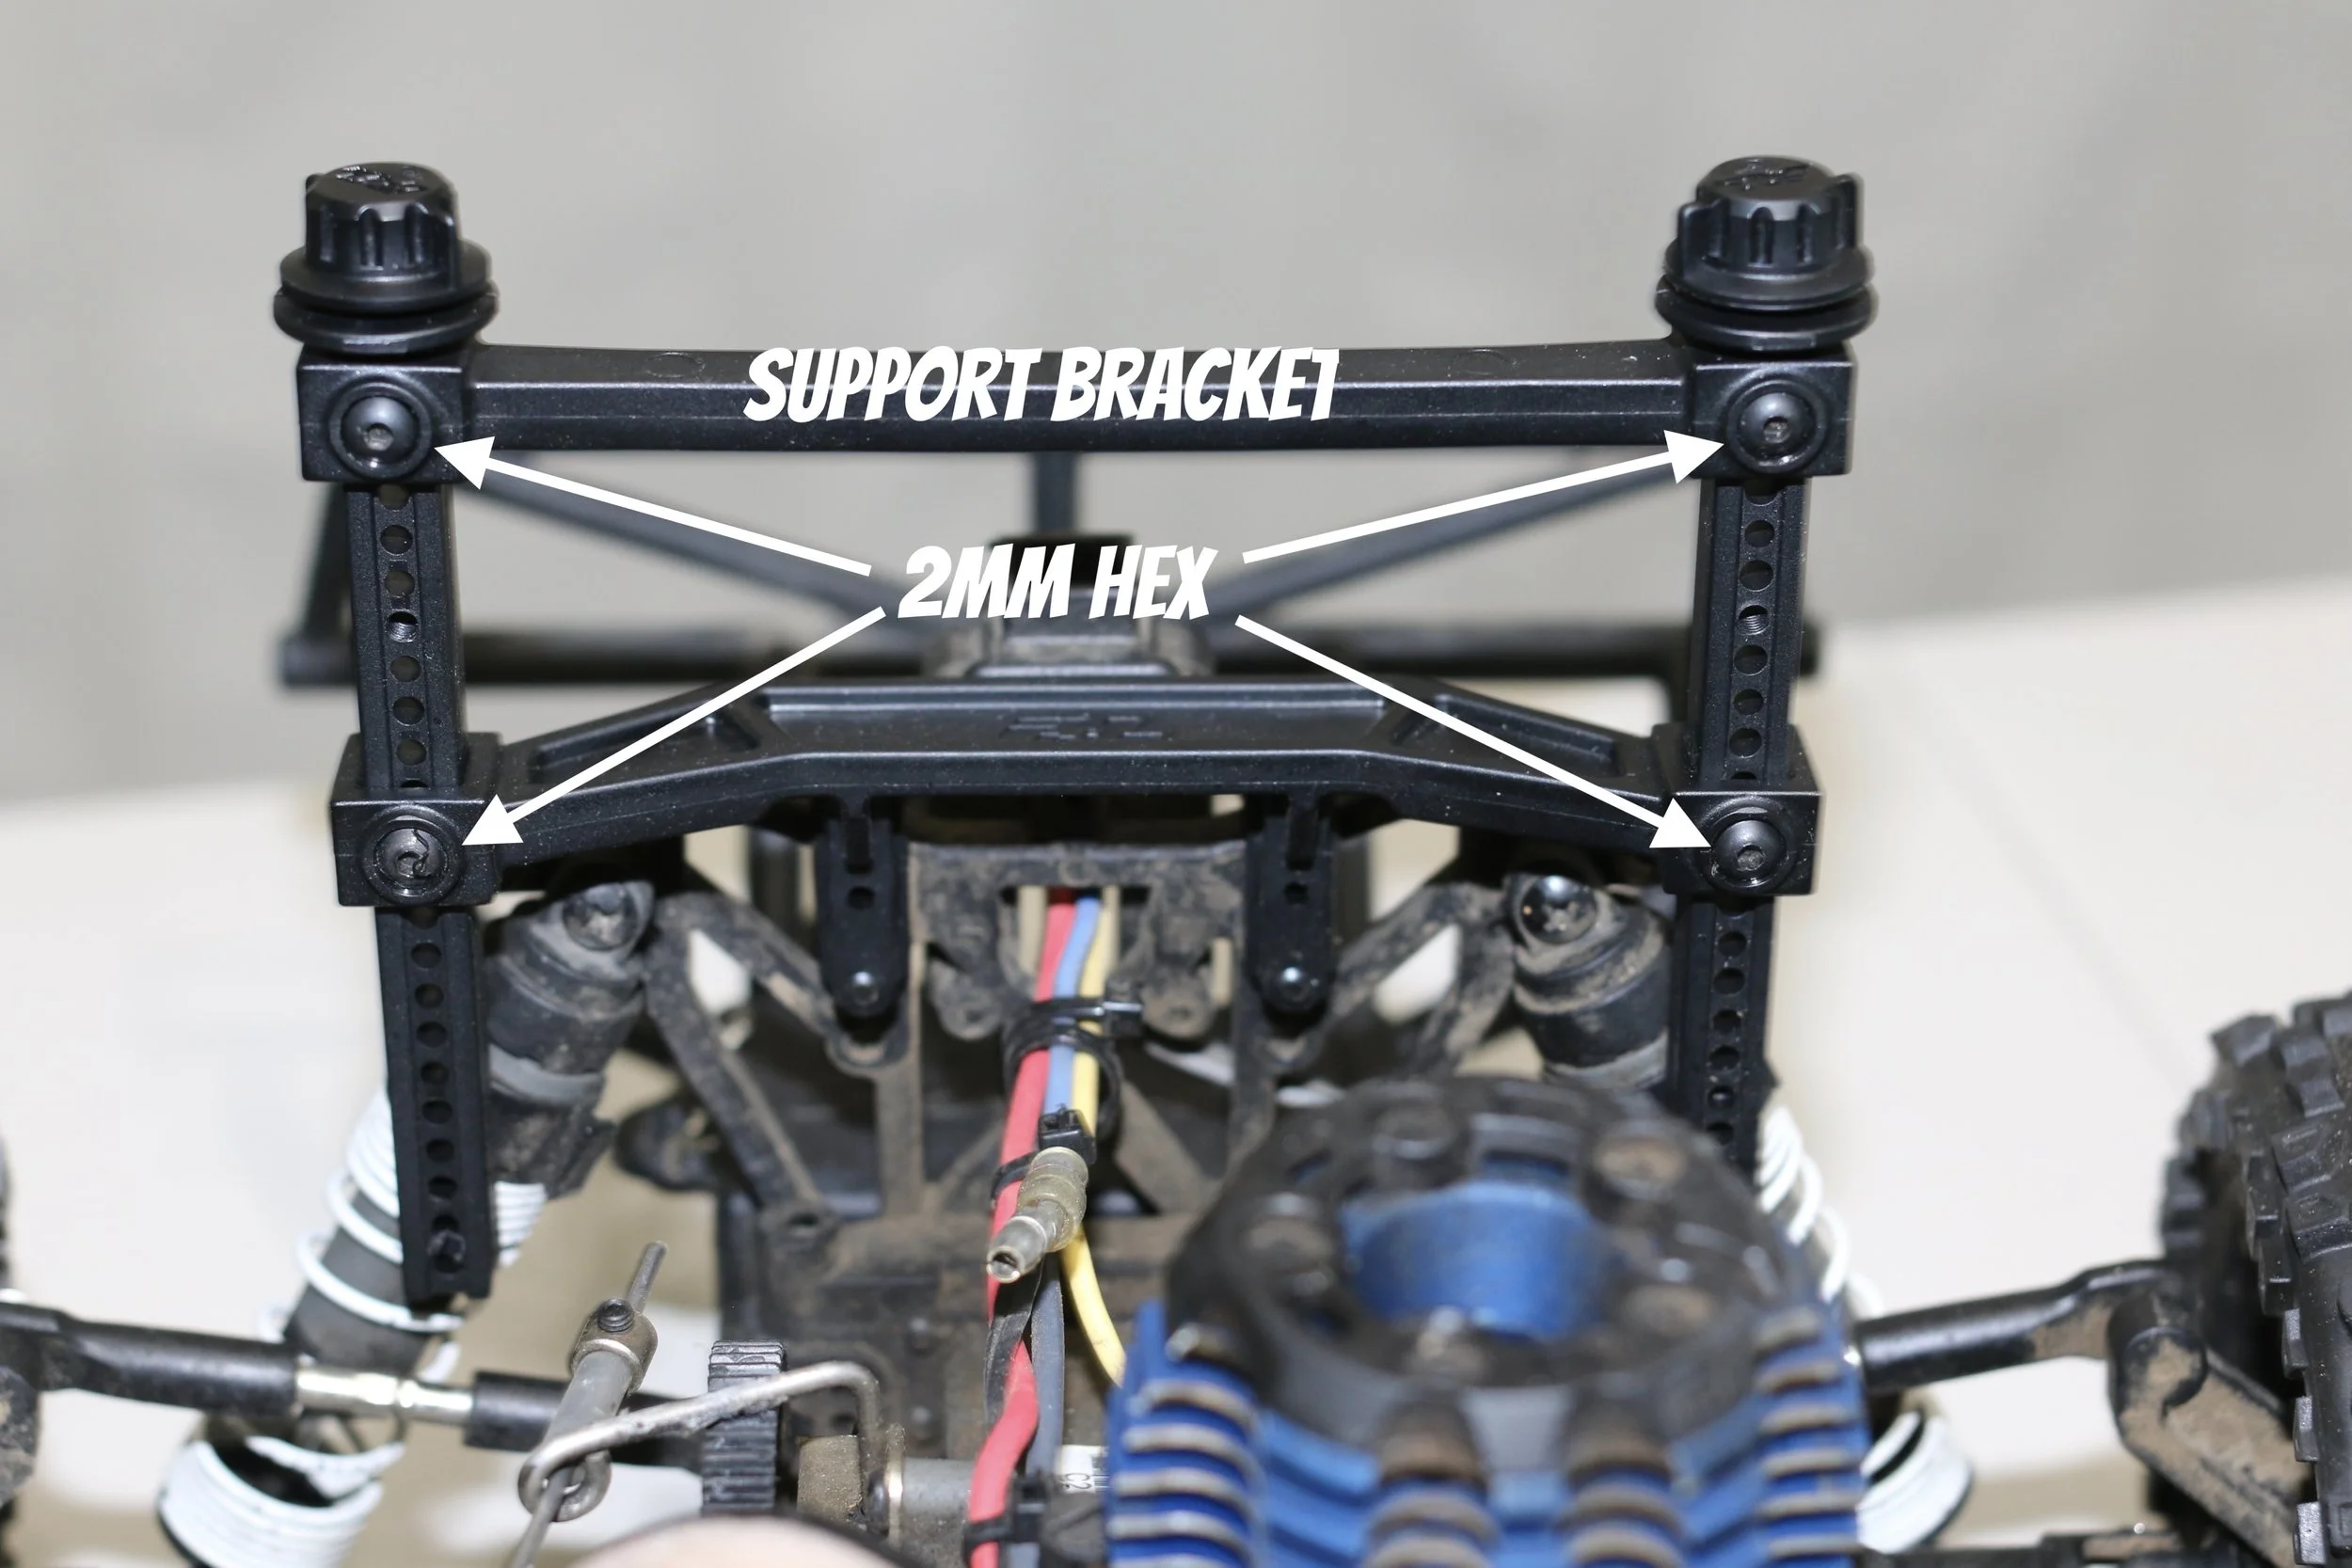
(Here are the hex screws in the front. You do the pointy end down, and then you have the 2mm hex on the top to thread the post into the plastic body mount)
(This is the rear of the truck. Here are the body posts for the rear end. The 2mm hex key is all that is needed to assemble and adjust the kit)
So, the good: the system is durable, flexible, and easily allows for a variety of body options.
What’s Bad… or Could be Improved?
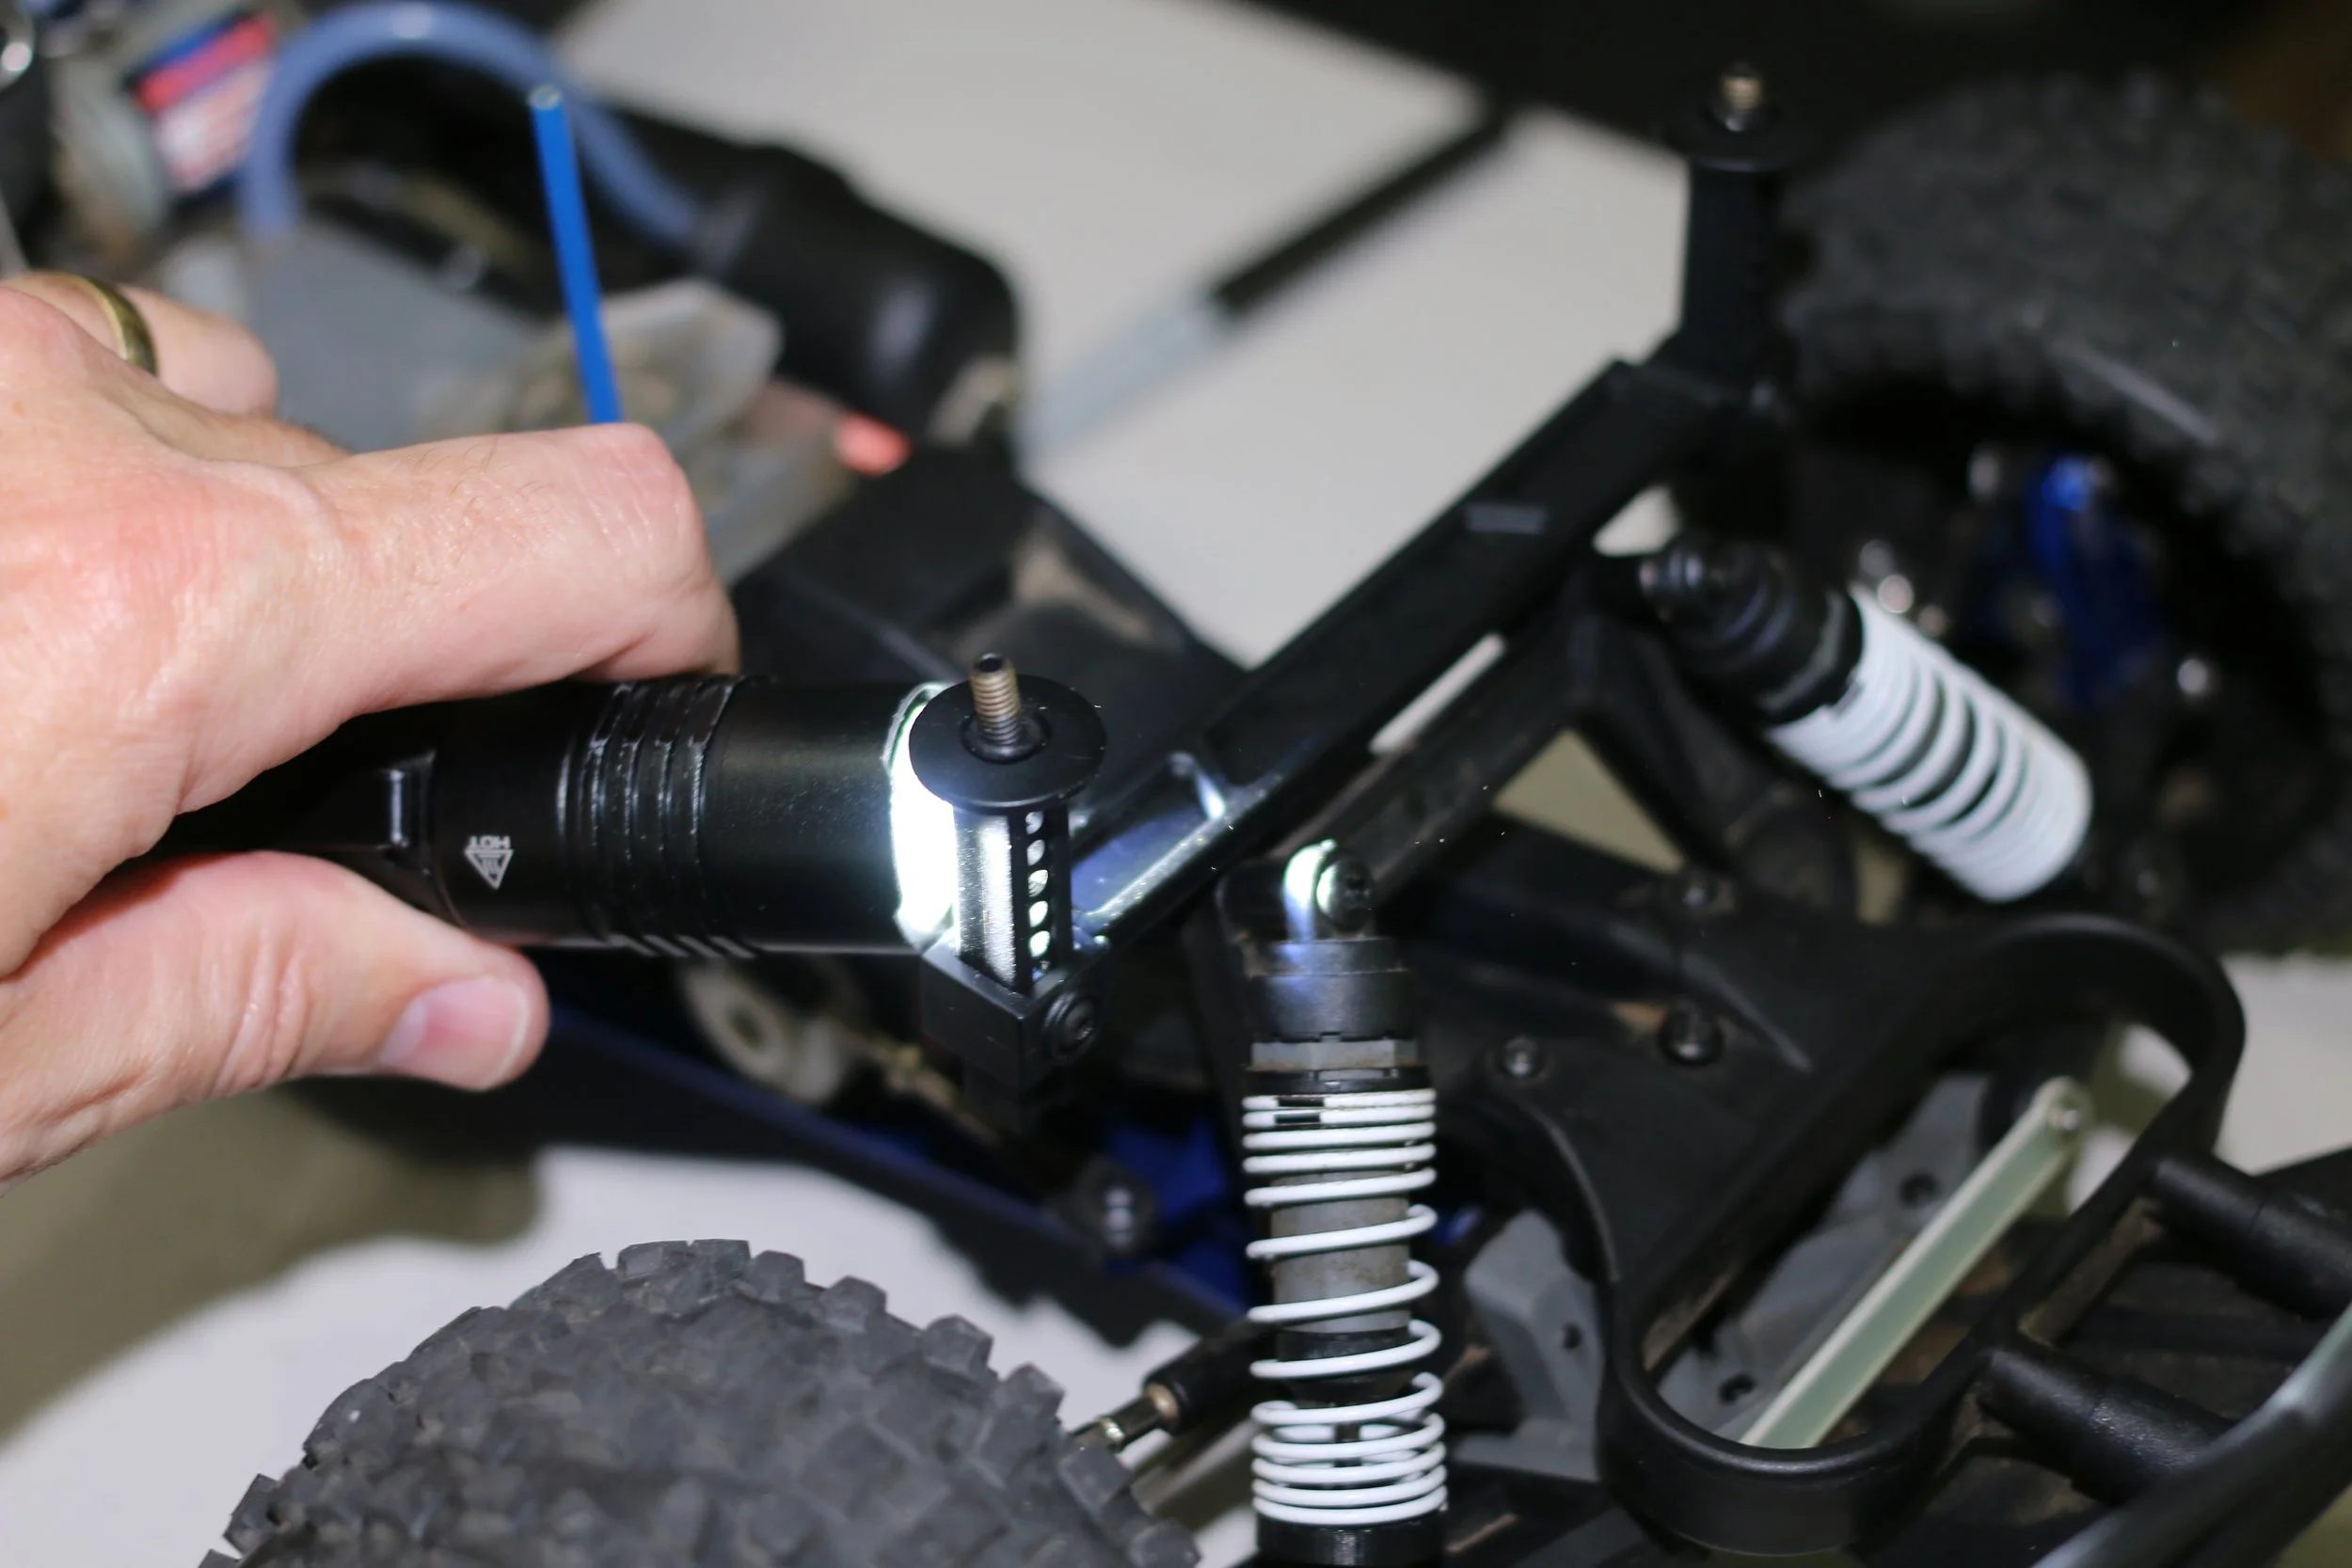
They are a bit of a PITA bread to get everything lined up when you adjust the body. You have to get the screws through the holes that are on the inside of the plastic. This was a bit of a challenge. It is a challenge to do it with the posts installed. However, I did find a way. When I figured out where I wanted the posts, I would shine a flashlight to make sure that the holes were lined up. When you see the light shining through, you can be assured that it is safe to go to the light. You want to go to the light. You won’t have an out-of-body experience, but your frustration will certainly die down.
This is sort of a funny thing, but there are no directions. It would be nice if Proline would even just give a sheet with some pics. The kit is self-explanatory, but it takes a little bit of trial and error to get it right. If you read the reviews on A Main’s webpage, you can see that some people still didn’t get it sorted out. Take your time, and don’t expect it to be done in 10 minutes. You’ll be fine and I think you will like the upgrade.
The other thing that bothered me is that the rear posts will block the rear suspension with the posts all the way down. This can be fixed if you move the support behind the rear suspension supports. The problem is that on the nitro truck, it will block the EZ start plug. My suggestion to Traxxas: give us a body without holes. This way, you can put the front of the body on the mounts and ream your own holes. If someone is going to paint their own body, they are going to know how to make the holes.
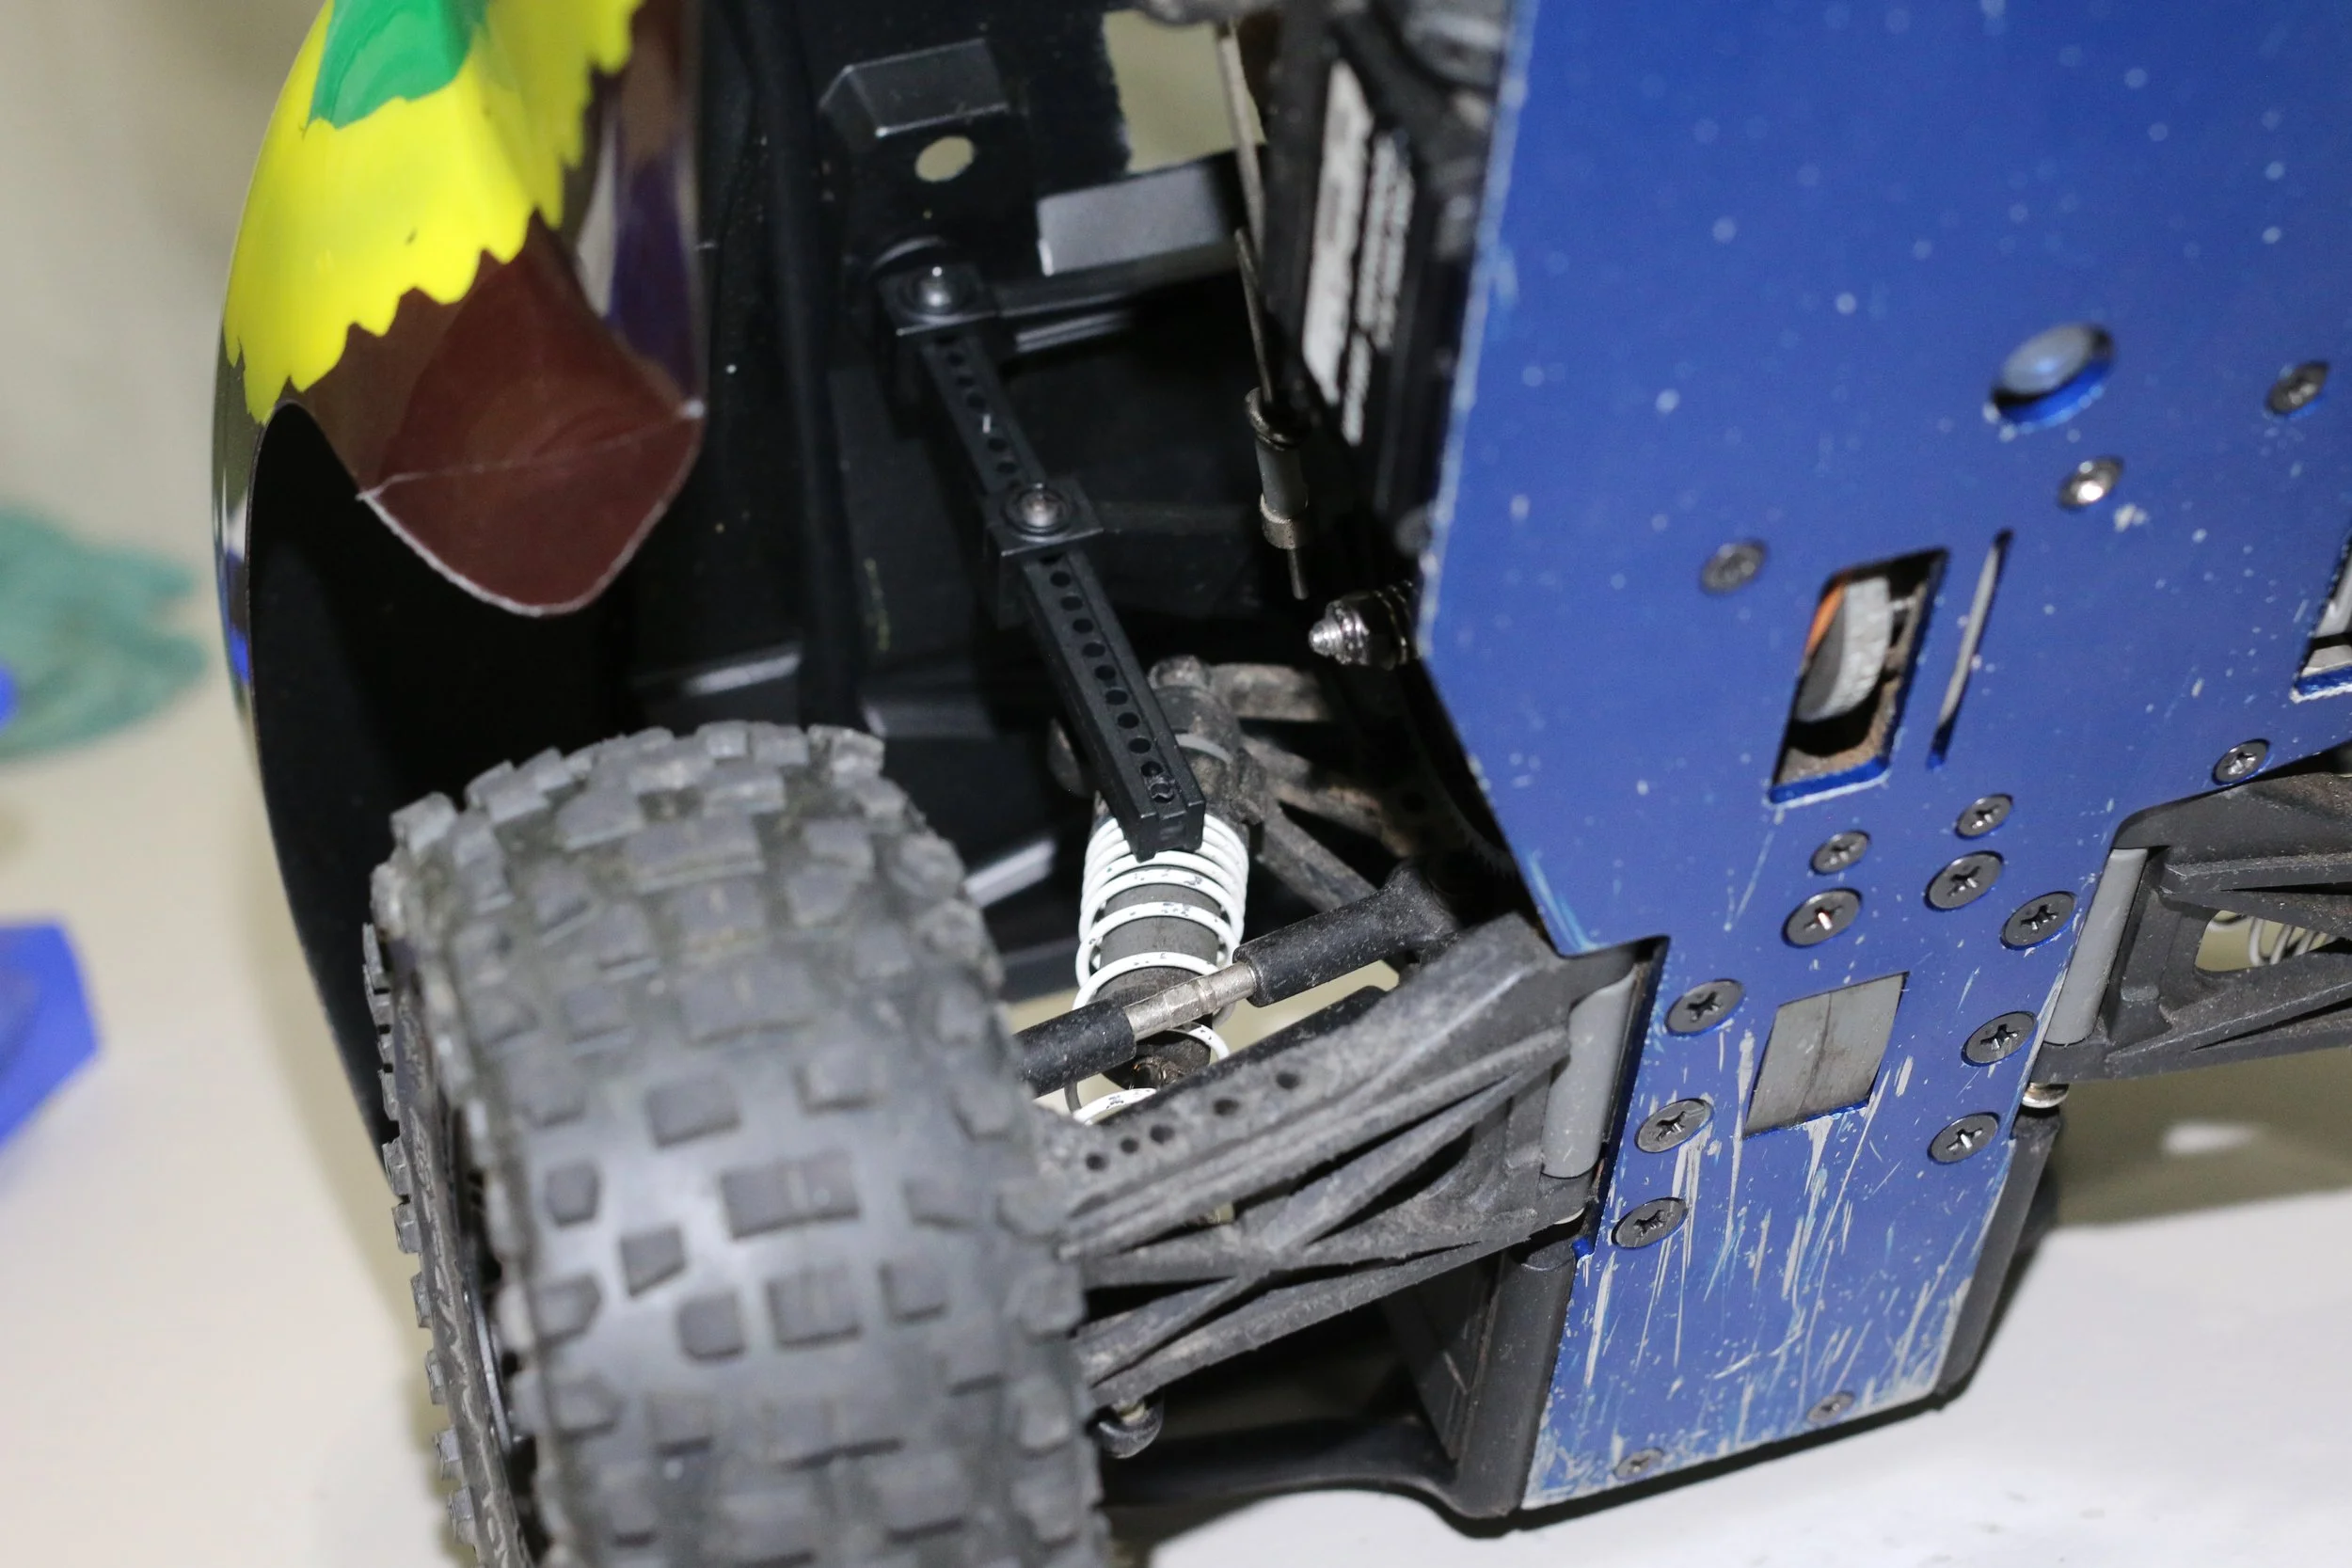
I tried to swap the rear body posts to the other side of the suspension, but as I mentioned then I blocked the EZ start sysem. So, on the nitro truck you will have to move the EZ start system to install this kit. I have a pull start for this motor and I might just put the EZ start in a box. I like the EZ start, but the is something else to remember when you want to drive the car. I think a future project will be to remove to system or see if there is another place to mount the plug for the wand. That is a future project.
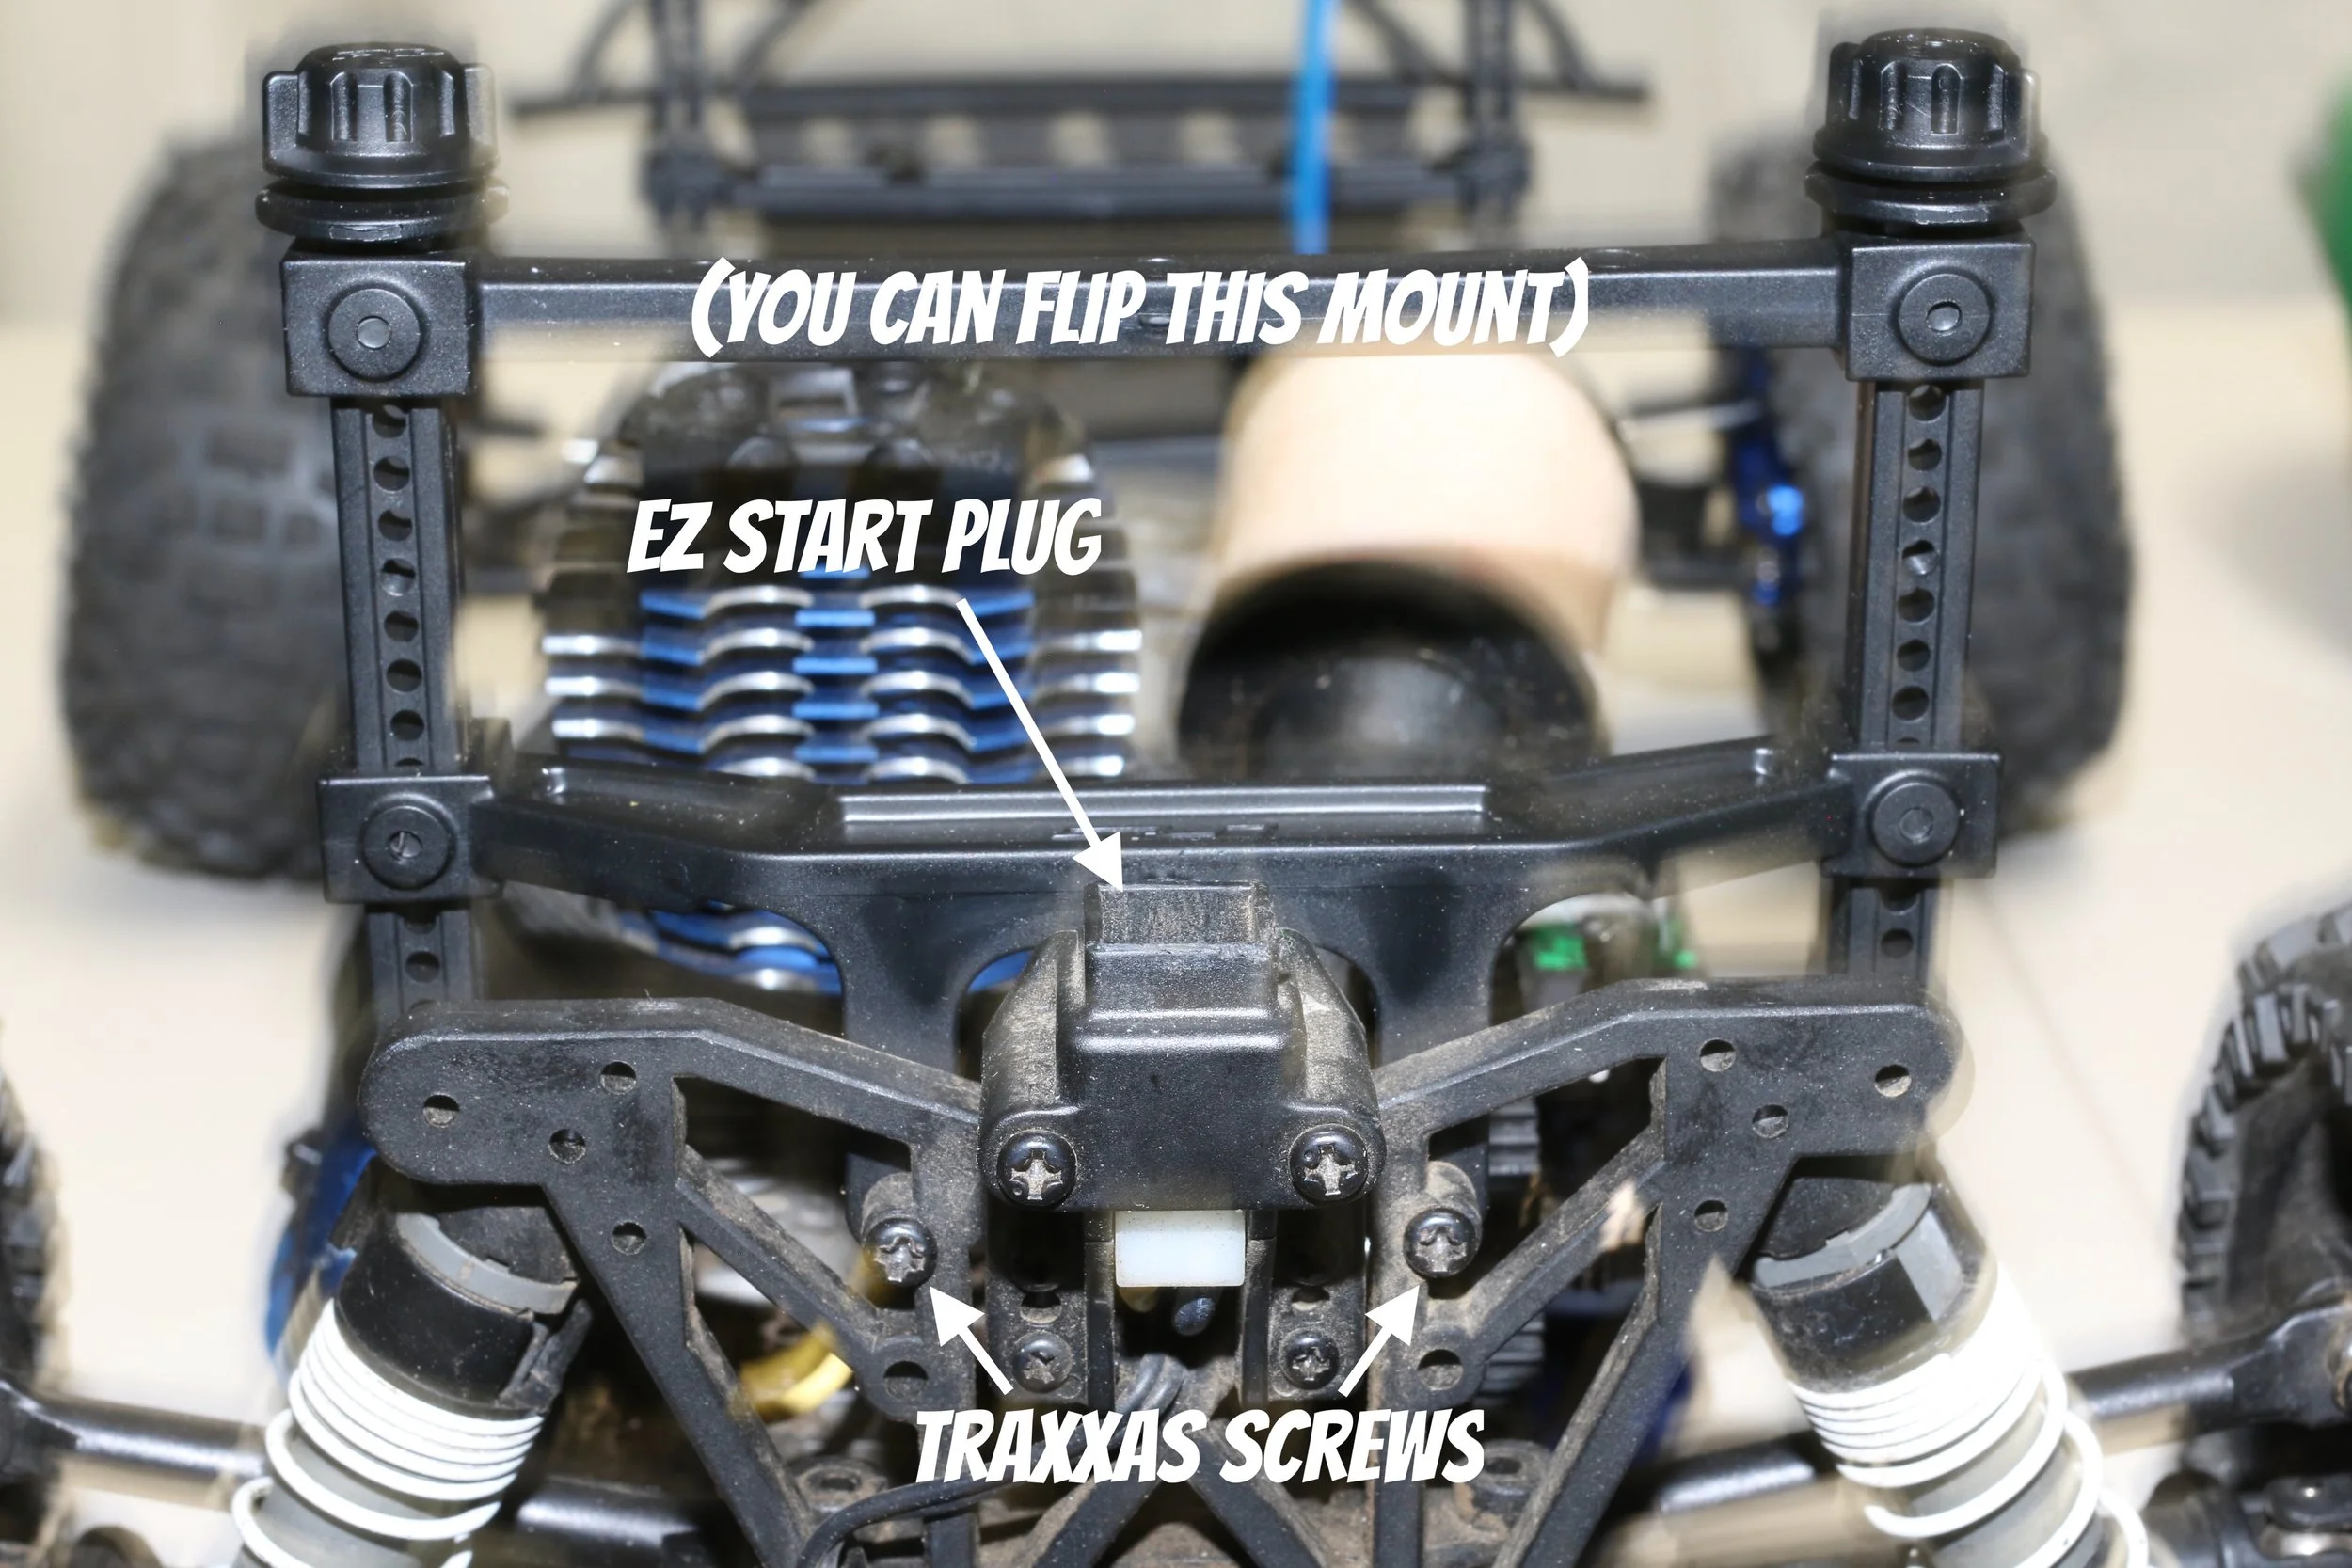
(You can flip the mount, put the screws in the same hole, but then you cannot access the EZ start. Flipping the rear mount would also allow for the posts to sit lower. So, there is a good chance this will be happening in the future.)
Overall, how does the system work?
Initially, I was not that impressed. I know that some of the reviews say that people had to drill out the holes, and I was with them. However, when I discovered the flashlight trick above I realized that you should not have to make new holes. Once I figured out the flashlight trick then it was pretty easy to get the holes and the screws lined up. So I think the system works pretty well once you figure it out.
The picture below are the threads poking through the body waiting for the caps. I hear the truck saying, “I want to run… please let me run…” Or I just have an over active imagination. You can see the threads poking through the body below. Yes, I did adjust them before doing a test run. I like being able to pop the little threaded studs through the body. It is pretty quick to take a body on and off.
The picture below is a pic of the body on the posts with the caps on the body.
In terms of nitro tuning…. well, these make taking the body off and on very easy! I love that! I know that people like dumping on Traxxas, and I guess I am dong that in this post a bit. I will say that as I live in a place where it can be 40 in the morning and 90 in the afternoon on a summer day that it is nice to be able to quickly remove the body to tune the truck at different times of the day. One place where I waste a lot of time is looking for the body clips. I remove a body, do the hour or two turn, and then forget where I put the body clips. These caps are not easily lost. So, you can quickly remove, put caps down, do a couple of adjustments, and you are back to bashing. I think that is my favorite thing about this kit.
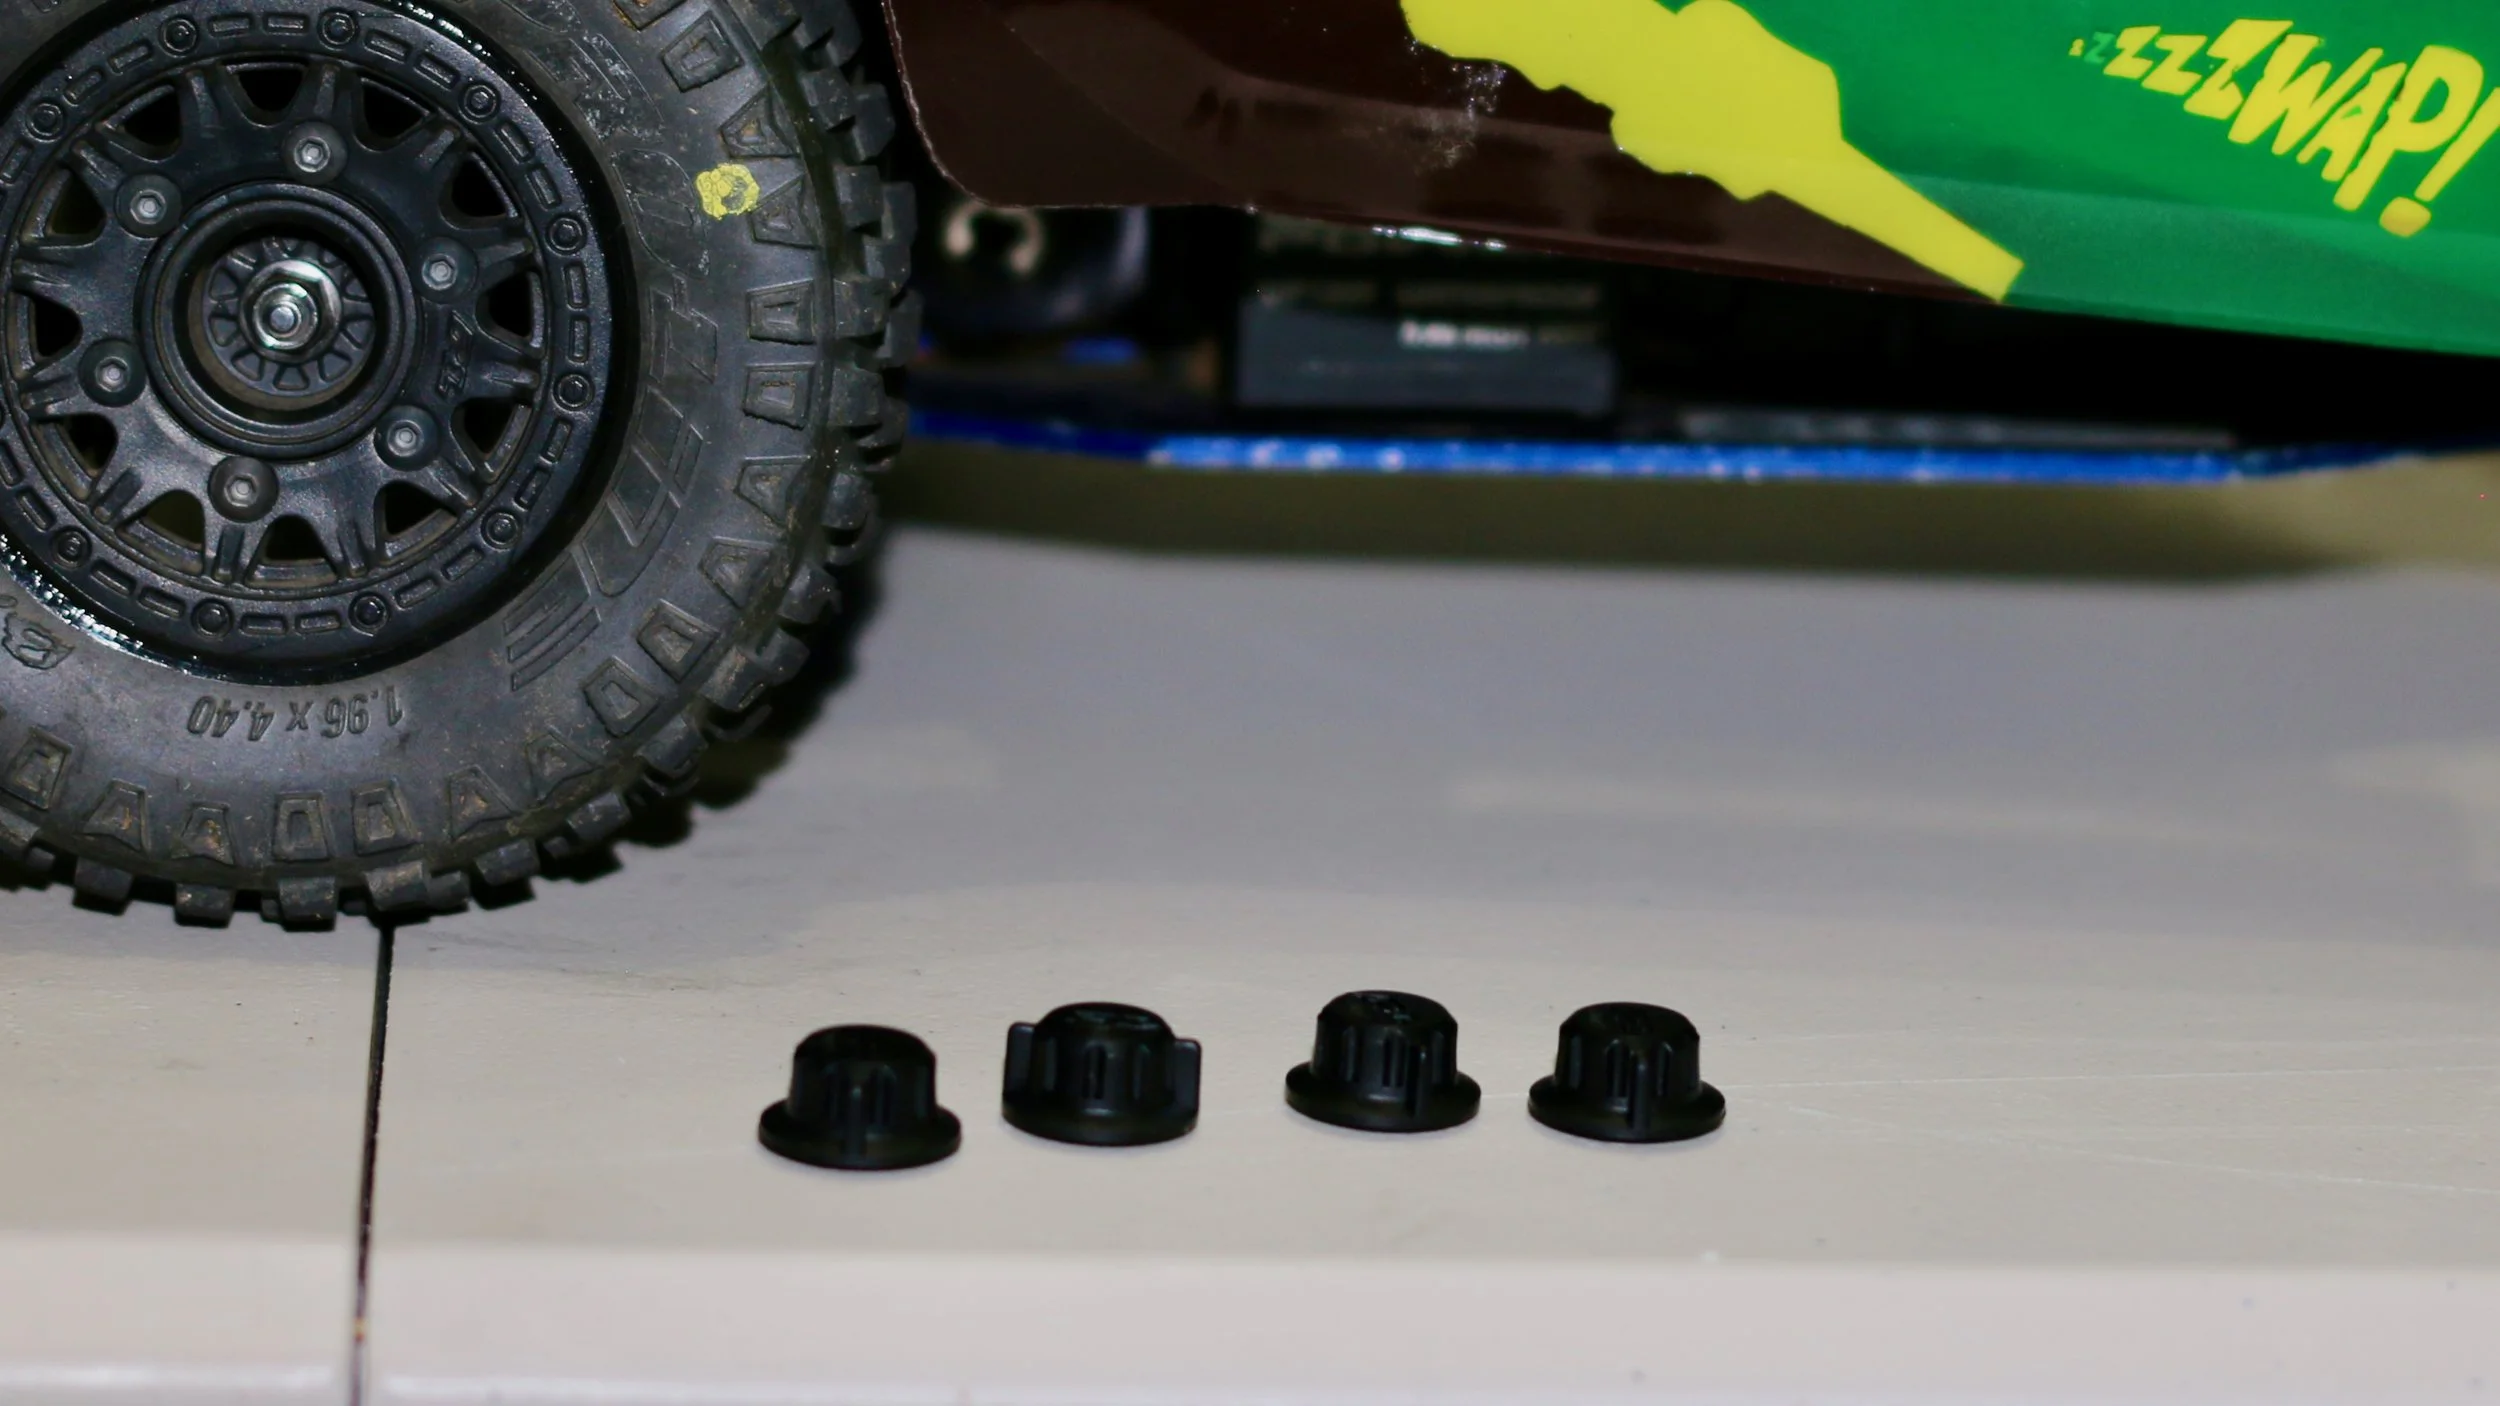
(You can see the caps on the table. You will find these pretty easily if you put them down on the ground.)
I would also imagine that these would be good on race day. The body is not slipping off at all! I also love the low profile that they have. The other thing that I noticed is you can adjust the body to sit higher on the truck so the wheels don’t rub the inside of the body. That is pretty cool. You can also lift up the back of the body to get more air to the motor.
Conclusion
If your wallet makes George Washington reach for sun glasses everytime you open it, well, these are worth the money. I don’t like to just squander my dollars and probably tend toward the penny wise and pound something or other…. you know that saying or something. However, this upgrade is worth the money. One of the things I like about RC is you can buy multiple bodies for one truck. So, you can feel like Jay Leno with quiver full of exotic and classic cars without the expense of figuring out where to store them all, insure them all, register them all…. etc.. I grant that RC is not the same joy as driving the 1:1, but it is close. I still like playing with nitro even though I prefer the electric simplicity. So, pick up the mounting kit if you are on the fence. Hopefully, this post will help you sort it out so your assembly time will be closer to 30 minutes. If you want to encourage me to keep writing you can always buy me a cup of coffee.
Thanks again for reading. I hope you enjoy the video below. Until we meet again may the Lord’s blessing and peace be upon you.